
Getting Around in GIMP - Layer Masks
An occasional question comes up concerning the use of Layer Masks for really controlling your edits to an image, and I thought I would approach the basics in this post. This is really a primer before moving into a much cooler topic - Luminosity Masks for controlling tonal ranges in a different way. (The Luminosity Masks tutorial is finished and can be found here!)
On a side note, this is also a method many people use for selective coloring an image. They will generate a desaturated version of their image, then lay a color version over it with a layer mask. You could then use the layer mask to only allow the color version to show where you painted it. (I am not a fan of selective coloring personally, but I’m not writing this post for me…)
Understanding Masks
First up is an understanding of how masks work in the first place.
Fundamentally, layer masks allow you to block out parts of the current layer that you want to show through. That’s pretty much it. In GIMP, a white layer mask means that everything on that layer is visible. Any black in the layer mask will make that portion of your layer completely transparent, and will allow whatever is below to show through.
The power of layer masks is that the transparency of your layer can be controlled by any shade of gray. If you paint on a layer mask with 50% gray, then that portion of your layer will be 50% transparent (and it all scales linearly). Layer masks are purely grayscale affairs, so you can only work in shades of gray.
A quick example should illustrate things nicely here:

Believe it or not, he was sober when he posed for this…
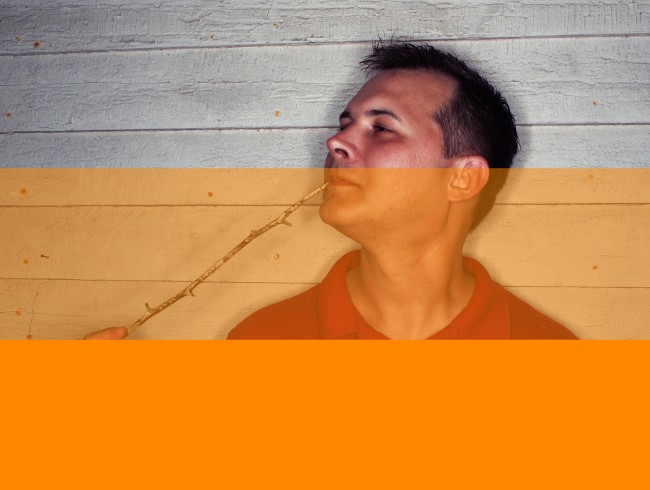
Meet my friend Steven. (Shot as a test of my DIY ringflash during a party). Below the layer of Steven I have put another layer filled with orange. I’ve added a Layer Mask on the layer of Steven, and painted three sections on the Layer Mask (from top to bottom): White, 50% Gray, and Black:

And this is what it looks like as applied to the layer of Steven (remember, the orange layer is below the Steven layer):
And this is what my Layers window looks like at this point:
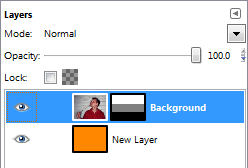
So as we can see, as the layer mask colors approach black, it makes the current layer more transparent to show what is below it.
I recommend you try this yourself to see what I mean. To add a layer mask to a layer, just Right-Click on the layer, and choose Add Layer Mask… If you’re just experimenting, you can just choose
Initialize Layer Mask to: White
to get started, this will make your entire layer opaque - then paint on black to choose what is transparent (or some other level of gray to control the amount of transparency).
Remember, the currently active layer (or mask) that you are operating on will have a white border in your Layers window (to select a different layer or mask to operate on, just Left Click on it).
Masks Example: Selective Coloring
To begin to see the power of using layer masks, we’ll go through a simple example of Selective Coloring. Perhaps we’d like to have a black and white image of Steven, but only let his garishly red shirt color show…
In that case I would take my base image of Steven, and duplicate the layer of his image (Background in my case). You can duplicate a layer by Right-Clicking on it and choosing Duplicate Layer.
This will give you a new layer called Background copy. Now you can activate that layer by Left-Clicking on it, then turn it to black and white by choosing Colors → Desaturate… from the menus.
You can choose any method to choose the shade of gray (I’m partial to Luminosity most of the time). Then Right-Click on the Background copy layer and choose Add Layer Mask…. I chose to add a White layer mask for full opacity (meaning the layer is completely opaque).
After following these steps you should see your layers looking like this:
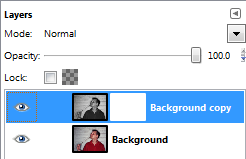
Color layer below, B&W layer on top with a white layer mask.
Now we are ready to bring out his shirt! Activate the layer mask by Left-Clicking on it, and choose a nice foreground color to paint with. Because we want his entire red shirt to show through, we’ll choose black for maximum transparency. We basically want to paint in the area where his shirt is with black to make it transparent on this layer, and to allow the layer below to show through (the color layer).
I’m going to use a Paintbrush Tool with a big fuzzy circle to paint over his shirt with.
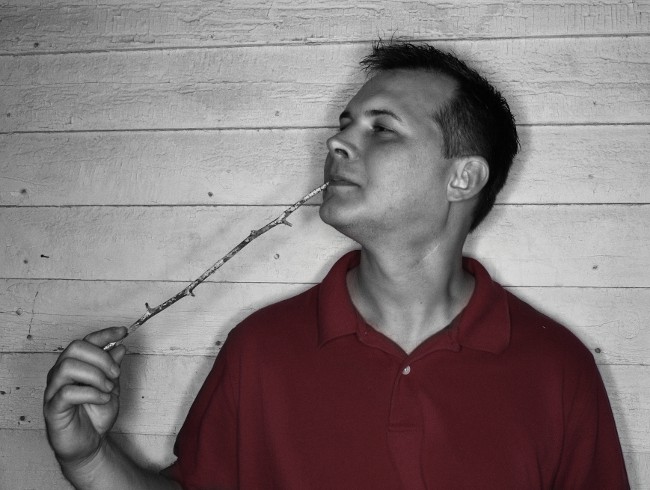
As you paint you should see that everywhere you paint the red shirt from the layer below comes popping through! After a quick painting session I’ve ended up with something like this:

The mask I painted looks like this:

Remember, I didn’t have to use black as my painting color - if I had used a light gray, I would have let some of the color through, but not as much (leading to a more muted effect). Here is what the same thing looks like, but painted with a light gray instead of black:
The corresponding layer mask now looks like this:

Hopefully this has been a reasonable introduction to layer masks. That’s really all there is to how they work. The power comes from manipulating the mask using other tools and approaches to really gain some amazing control over your image. In particular my next post will focus on creating and using luminosity masks to really control the tonal ranges in your images in a new way!
If you’re ready for it, then head over to the next tutorial on how to start using these masks at Getting Around in GIMP - Luminosity Masks!