
Getting Around in GIMP - Heal Selection (Resynthesizer)
I’ve been reading through a ton of hyperbole about Adobes Photoshop “Content Aware Fill” for some reason lately (“magical”, “incredible”, “amazing” and others are fun to read).
I don’t think I would be too far off in assuming that Adobes implementation is likely based off the wonderful work of Dr. Paul Harrison. Dr. Harrison’s PhD thesis just happened to yield the code that gave GIMP users the Resynthesizer plugin, which has provided us a “Content Aware Fill” for quite a while now (since before 2005).
If you’ve ever spent any time with the Clone Tool or Heal Tool in GIMP, and haven’t tried out Heal Selection with Resynthesizer, then you might find the results of this filter very helpful.
I have since looked at a newer algorithm for doing this, Inpainting [patch-based] in G’MIC. I think it’s now a better option for me, check out the post here: Getting Around in GIMP - G’MIC Inpainting (Content Aware Fill)
What does it do?
The basic premise behind Resynthesizer is that it will sample image textures from a given area, and will build a new texture from that data. The texture will be combined from segments of the selection in a random orientation. The plugin will also clean the feathering between segments to maintain a relatively consistent contrast, thus minimizing its visual impact on the result. (This is a very simplistic explanation of what’s actually going on under the hood - there are some neat pixel neighborhood comparisons going on, actually).
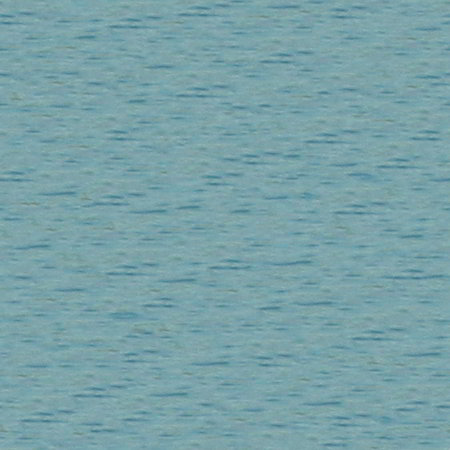
So to illustrate, here is a small 100 × 100 px sample of some water:

Now running Resynthesizer on a larger canvas area (450 × 450) will yield:
After Resynthesizing
This produces a pretty nice new texture! Random enough that there are no discernible repeating patterns that would give it away as a rebuilt texture.
An interesting use of Resynthesizer for seamless textures explored by GimpChat.com user lylejk is described in this thread, for example.
Now, creating good seamless textures is handy, but what does it have to do with healing selections in our image? Well - this same code can be used to fill-in areas of our image from data nearby. This is exactly what the companion Script-Fu “Heal Selection” will do, with some neat options…
Heal Selection
So let’s have a look at healing scenes from an image. Once you’ve installed the plugin and associated Script-Fu, the option will be available from:
Before we fire up the command, though, we just need to look at a couple of things. I’m going to use a cropped portion of a larger image to demonstrate:
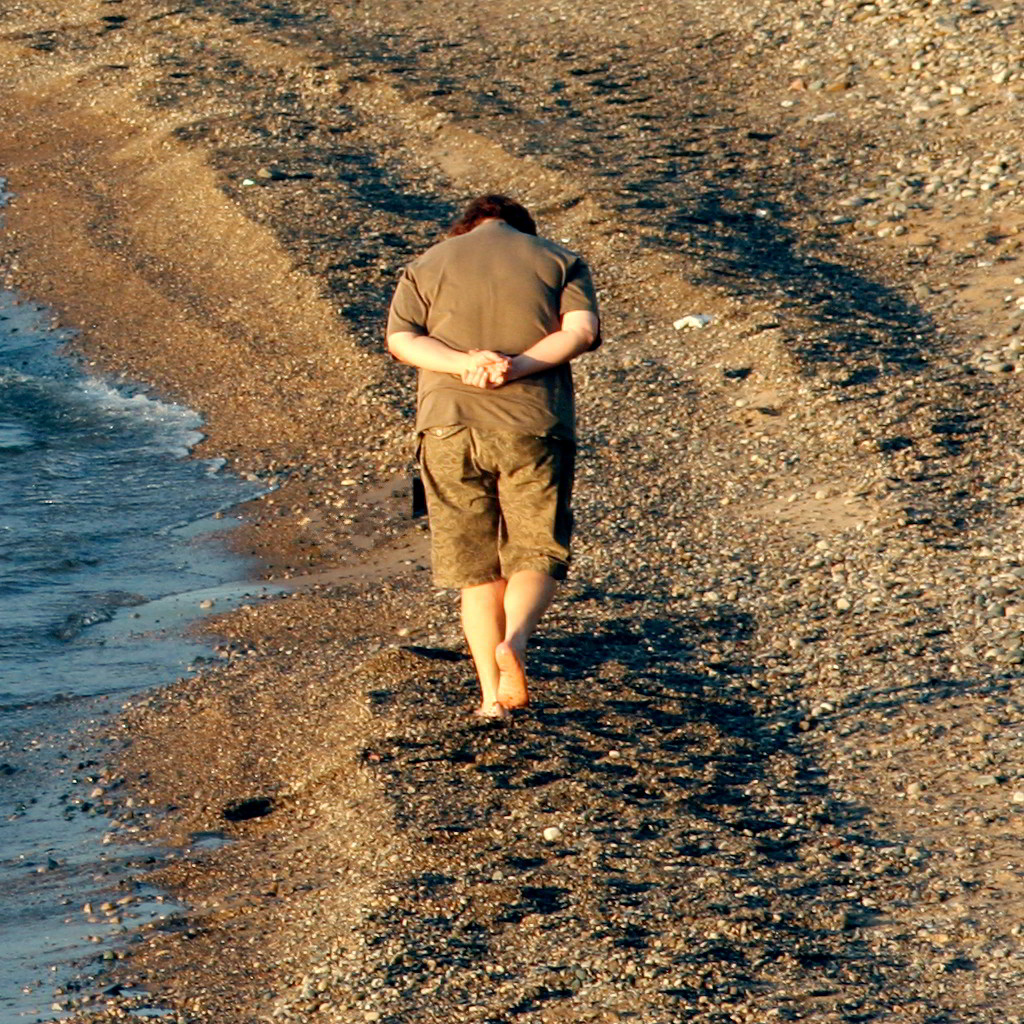
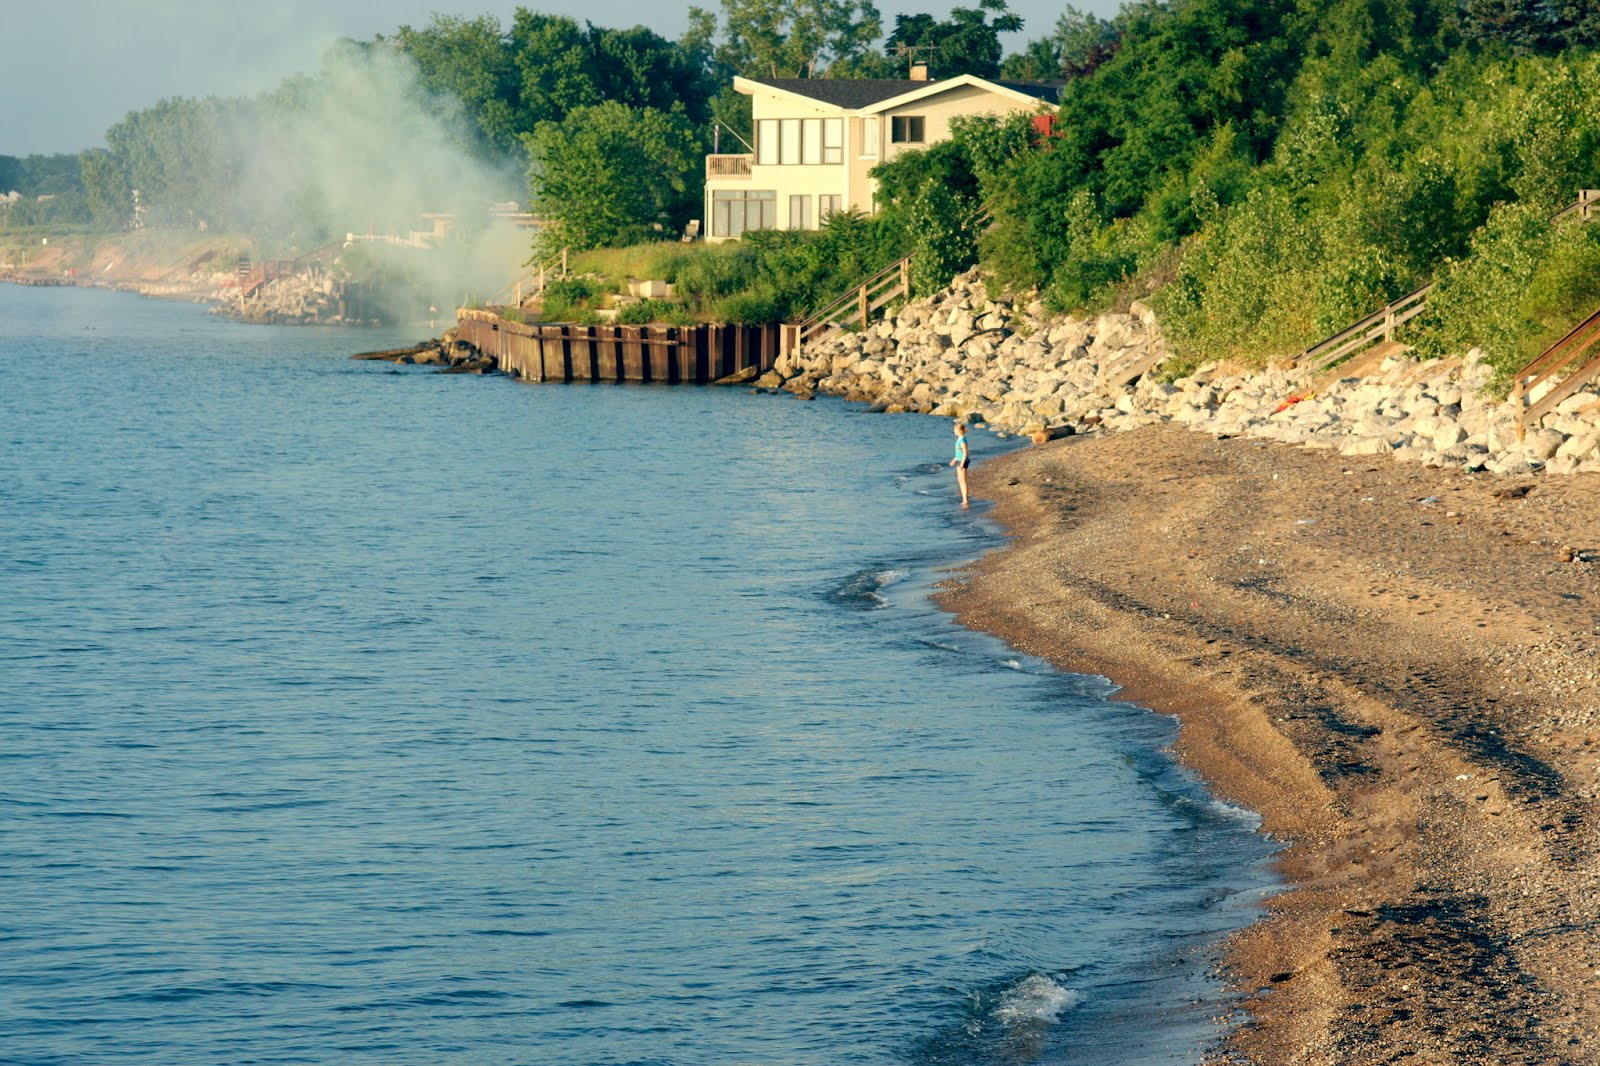
Let’s remove this person from the beach
Now, the normal way you might use Heal Selection to remove this person would be to create a selection around them, and then just run the command. So let’s first create a selection around the object we want to remove.
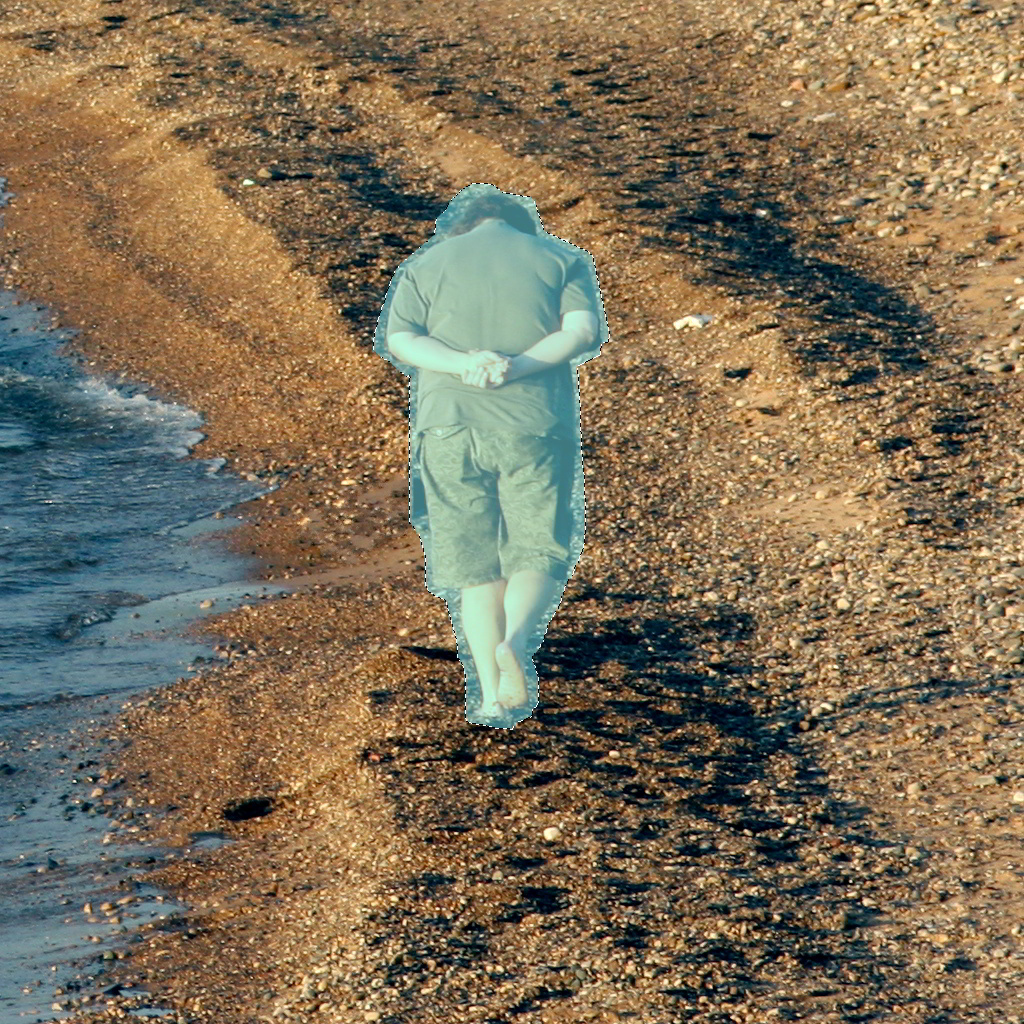
I’ve colored in the selection to make it more visible
With our selection made, we could then start the Heal Selection dialog.
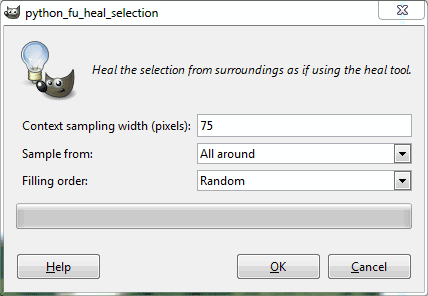
Before we run this, command, though, let’s have a quick look at the options and what they mean.
The Context sampling width will allow you to choose how far out from the edges of your selection to sample for textures to fill with. In my example I am saying to use the surrounding image up to 75 pixels away from the edges to create the new texture that will be used to fill up my selection.
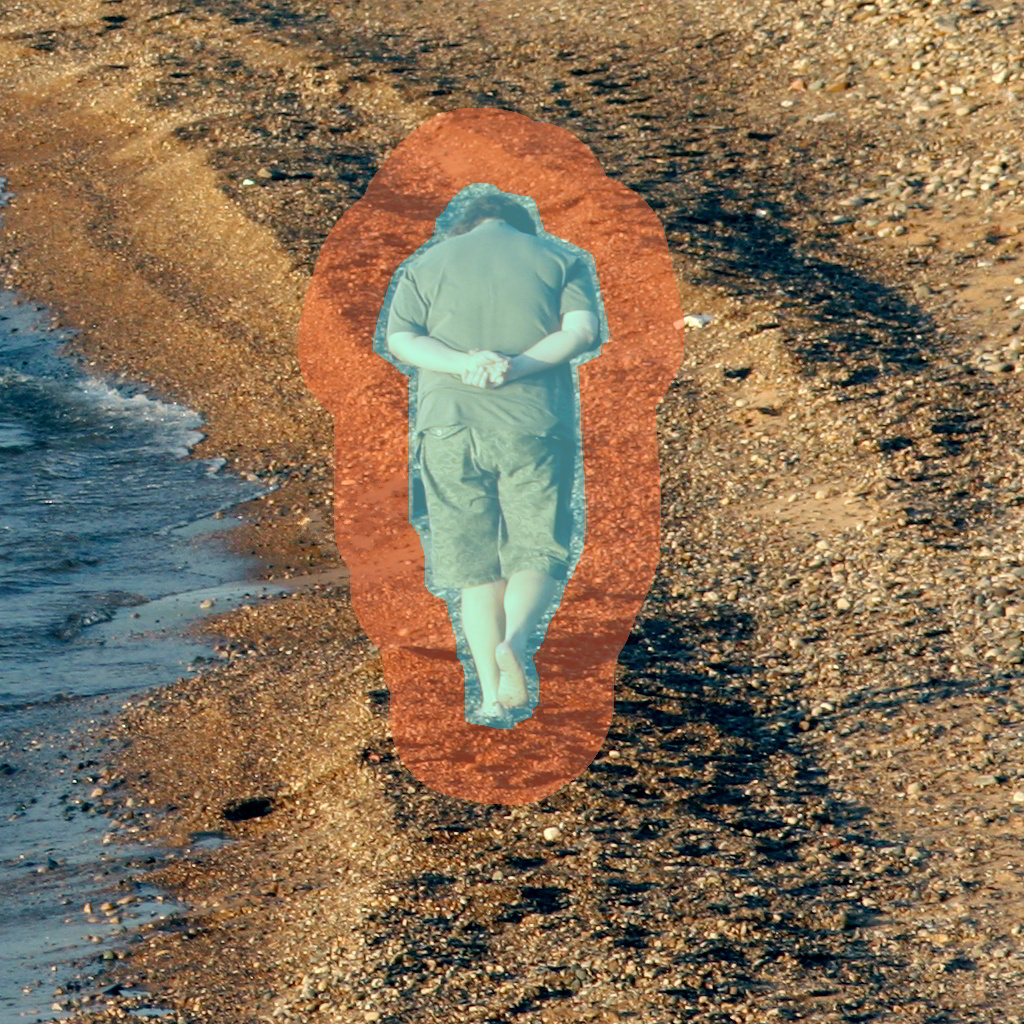
Selection to Fill and the 75px surrounding area to get the texture from.
If I run the command now, then what will happen is that the script will use the surrounding 75px area to build a texture to fill in my selection , and it will randomly fill the selection area for me.
So let’s see how good of a job it will do with these (mostly) default settings:
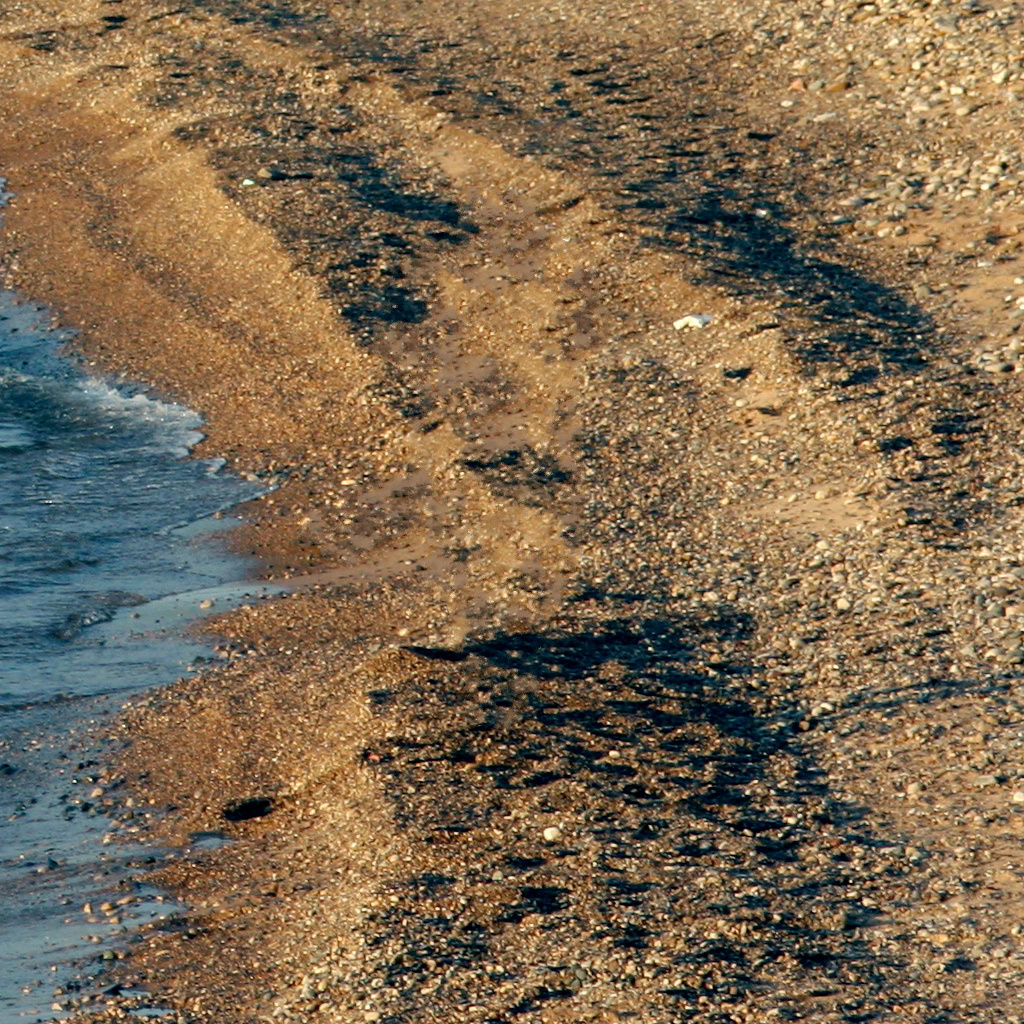
Well, wow. This has certainly done an admirable job in my opinion! The rebuilt portion of my selection contains enough randomness to blend very nicely without any artifacts to give it away.
The thing you really want to take away from this section is the use of the Context sampling width to adjust how far away from your selection to sample for the new texture. If you make the value too small for a large selection area, it may end up looking funny (due to having a small amount of pixels to sample from in order to fill a large area).
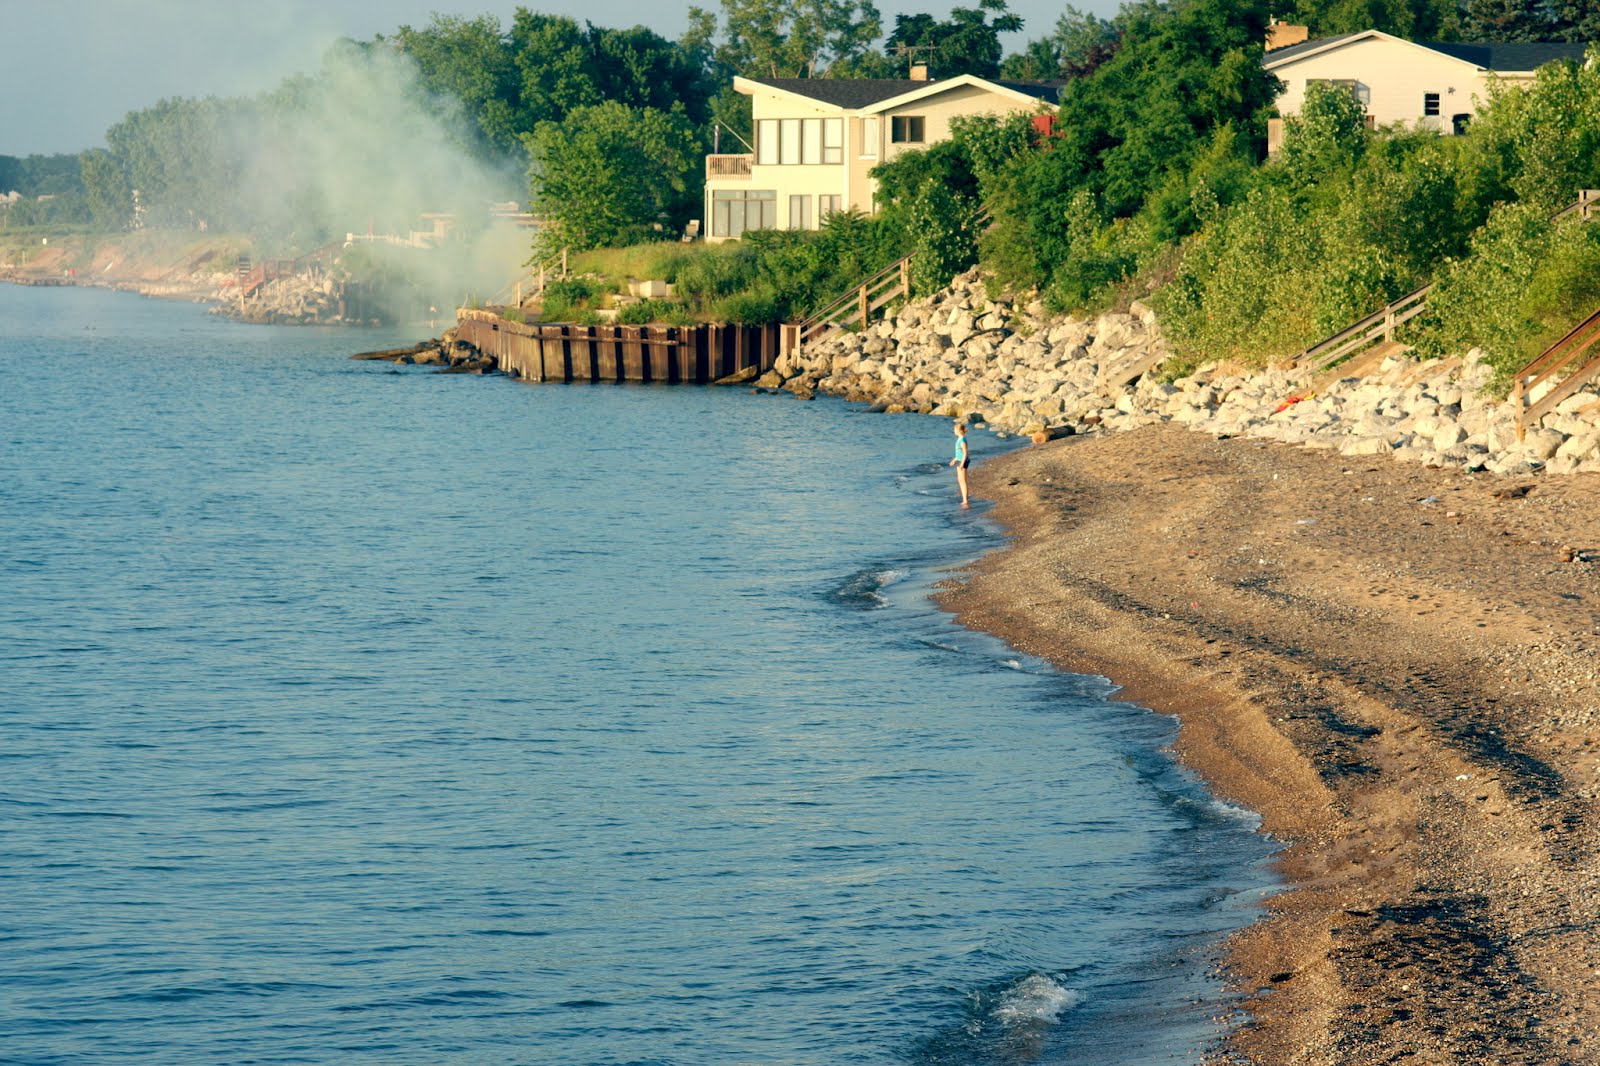
Well, we certainly can’t stop here - so let’s experiment even further with the entire image:

I have already removed the person in the lower right frame of the image, and I will also remove the people in the water, and the man on the shore. I’ll leave the small girl there for aesthetic reasons.
You can also select multiple areas to have Heal Selection fix them all at once if you’d like.
For instance, I will choose the man in the red shirt and the people in the water at the same time (don’t forget to remove their shadows and reflections in the water):
If you want to be able to quickly visualize the sampling width, once you’ve made your selection you can grow it to the width you want using:
then just Undo the Grow to get back to your original selection. Heal Selection works wonders provided that you have a relatively consistent type of surrounding textures to work with. It even does wonders where you might not think it would at first.
While playing around for this tutorial, I said “What if I wanted to remove the house in the upper right of the image?”
Well, turns out Heal Selection did a dandy job of fixing that right up for me:
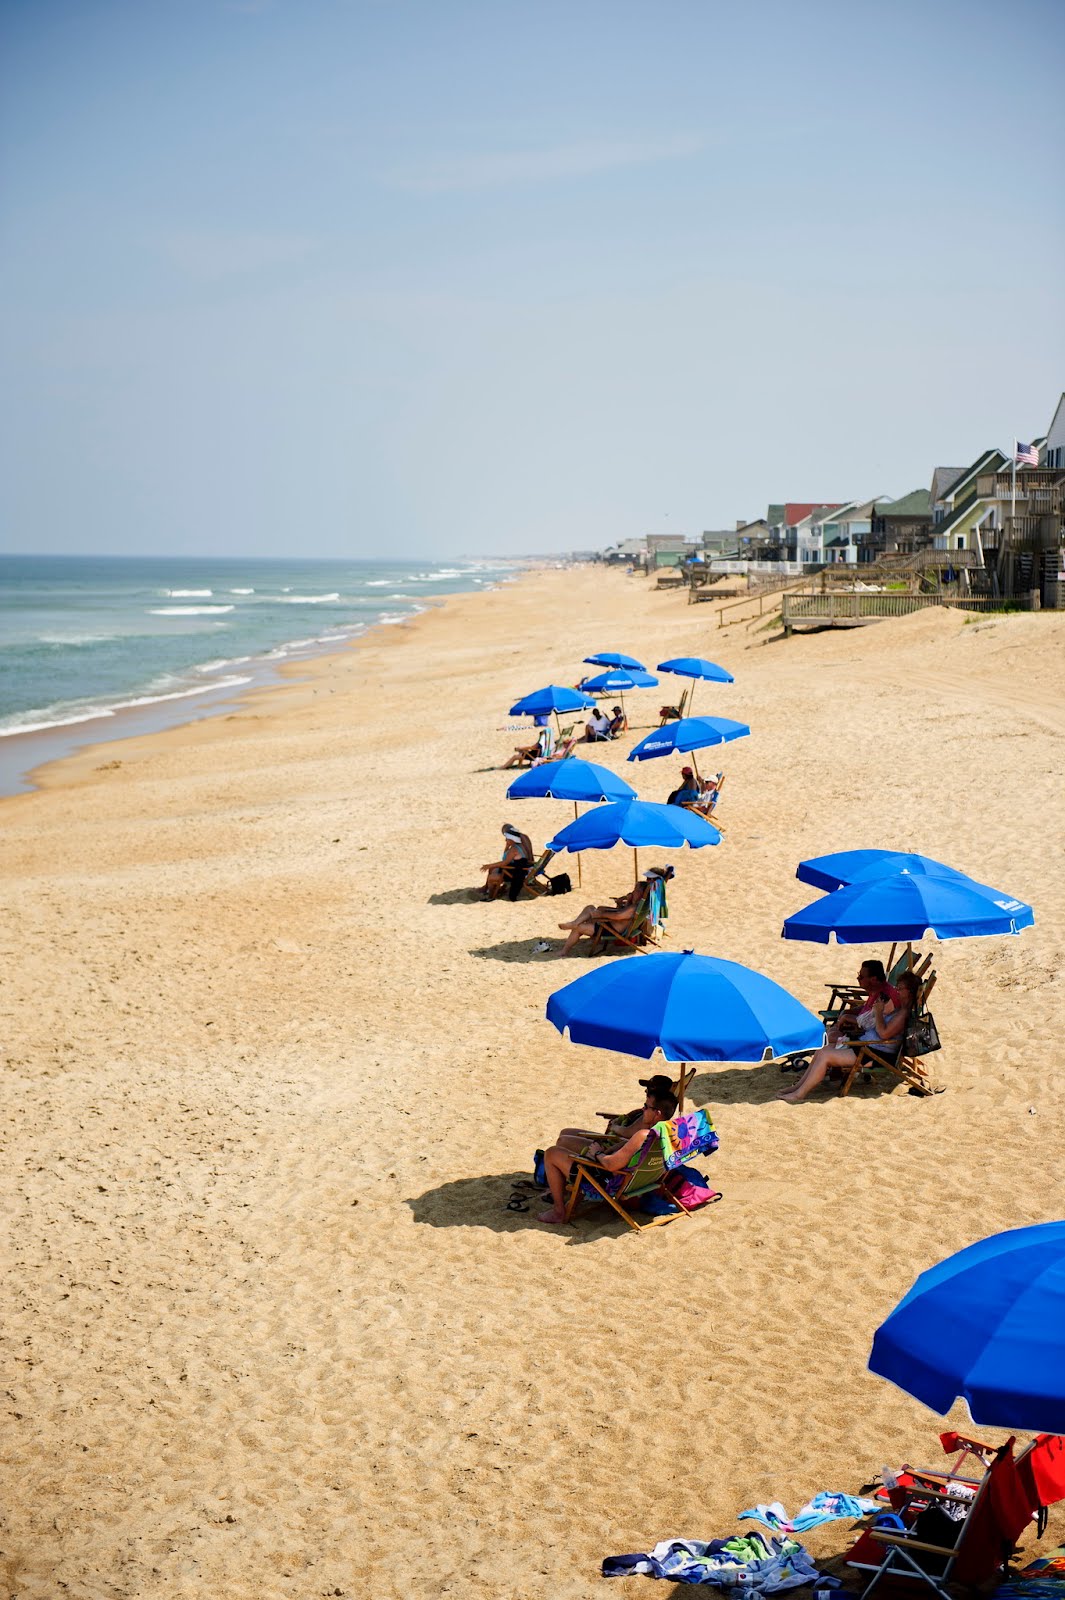
One other quick example, a nice serene beach scene (try guessing where the changes were made before you hover your mouse over it):
A Few Tips
There’s a few things to keep in mind when using Heal Selection that might help you to achieve better results.
First is that depending on the geometry that you want to heal, the Sample from options will dictate from where around your selection you want to source pixels. The default will be All around, but the other two options can come in handy: Sides and Above and below.
This will restrict Heal Selection to choosing pixels only from either the sides, or above/below the current selection. I’ve found this helpful especially in places where there is a hard delineation in an image (trying to remove an object that crosses over the horizon, for instance).
I’ve used these options oftentimes in order to only partially remove an object from a scene (as part of a longer workflow). This is very handy around areas with a hard delineation.
For instance, remove the lower half of this telescope post to rebuild the brick wall behind it:

As part of a workflow, I only want to remove the post in front of the brick at the moment
Here is using the default Sample from: set to All around:

Now if I restrict the sampling area to only the sides of the post, I will only get rock textures to create my fill textures with, which is much more desirable here:

This yields much better initial results for me to work with. The same method can be used for vertical edges as well (in which case you’d only sample from above and below).
A second tip that might be helpful is that you can run Heal Selection multiple times if needed in an area. Because the textures are being sampled from the image nearby, the overall grain/quality of the results will be close enough to the original to not stand out (though this entire process is very destructive to an image - so keep that in mind).
For instance, if I wanted to touch up the results from removing the post just a little more, I might want to remove the shadowed rock along it’s top edge. No problem - just re-select a new area, and run Heal Selection one more time:

Healing Panoramas
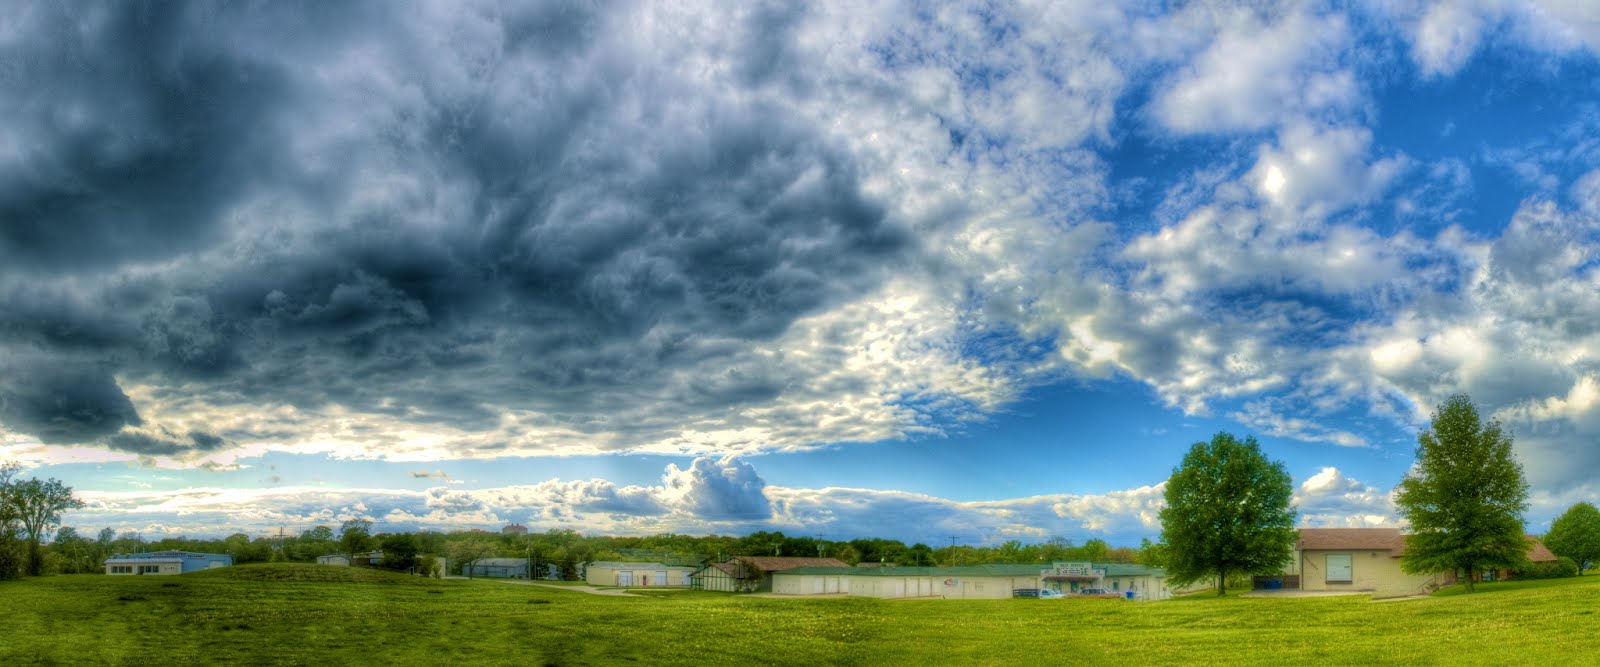
Of course, just like Adobes “Content Aware Fill”, we can also use Heal Selection to extend areas of panoramic images where we are lacking source material. For instance, this is not an uncommon result of some panoramas:
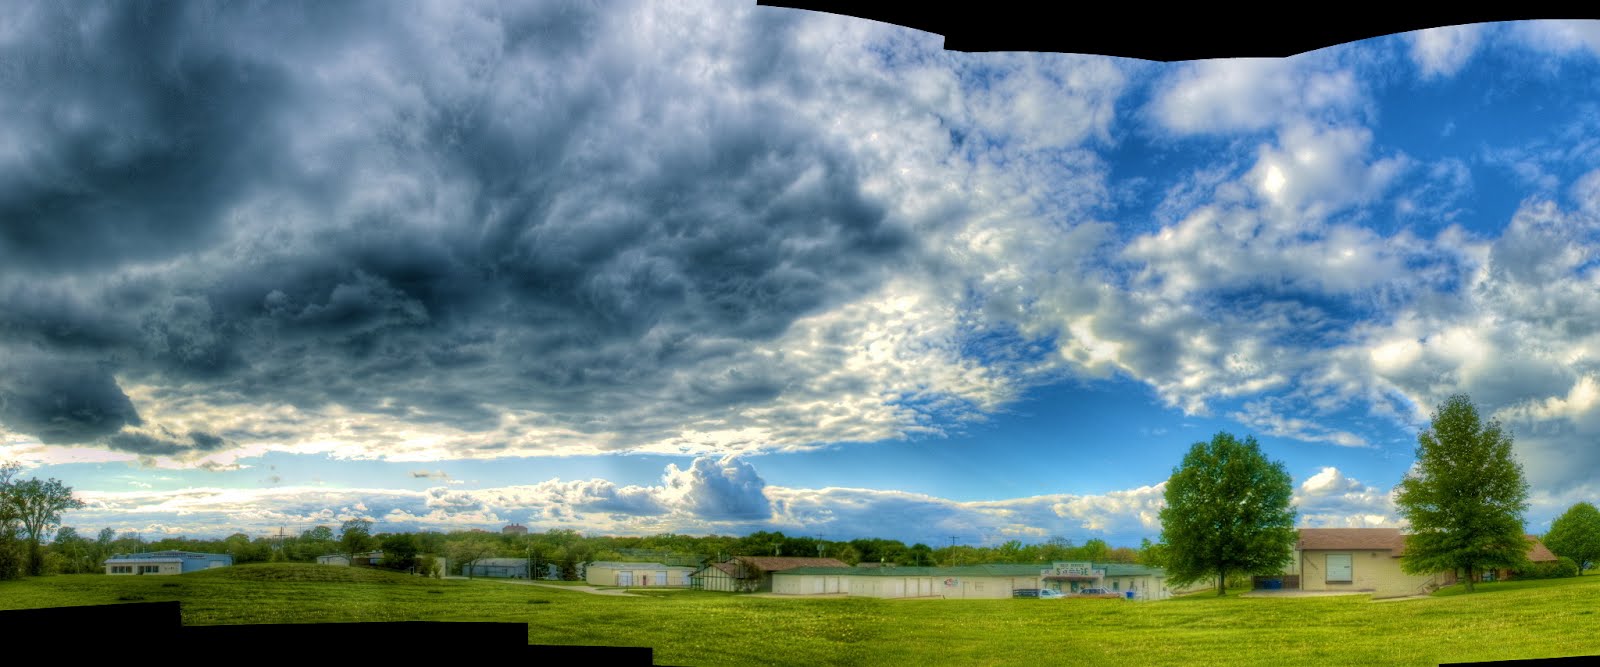
Using Heal Selection, we can have Resynthesizer rebuild the missing data for the sky and grass, using the nearby image texture data. In this case I just selected the black background areas, then grew the selection a bit to overlap the actual image.
Then, because I wanted to just sample from areas directly above the grass, and directly below the sky, I set Sample from to Above and below.
This can be especially helpful to those creating 360° panoramas, and either don’t capture a full, clean nadir or need to remove a tripod leg… (I had previously written about this image in my post On Little Planets).
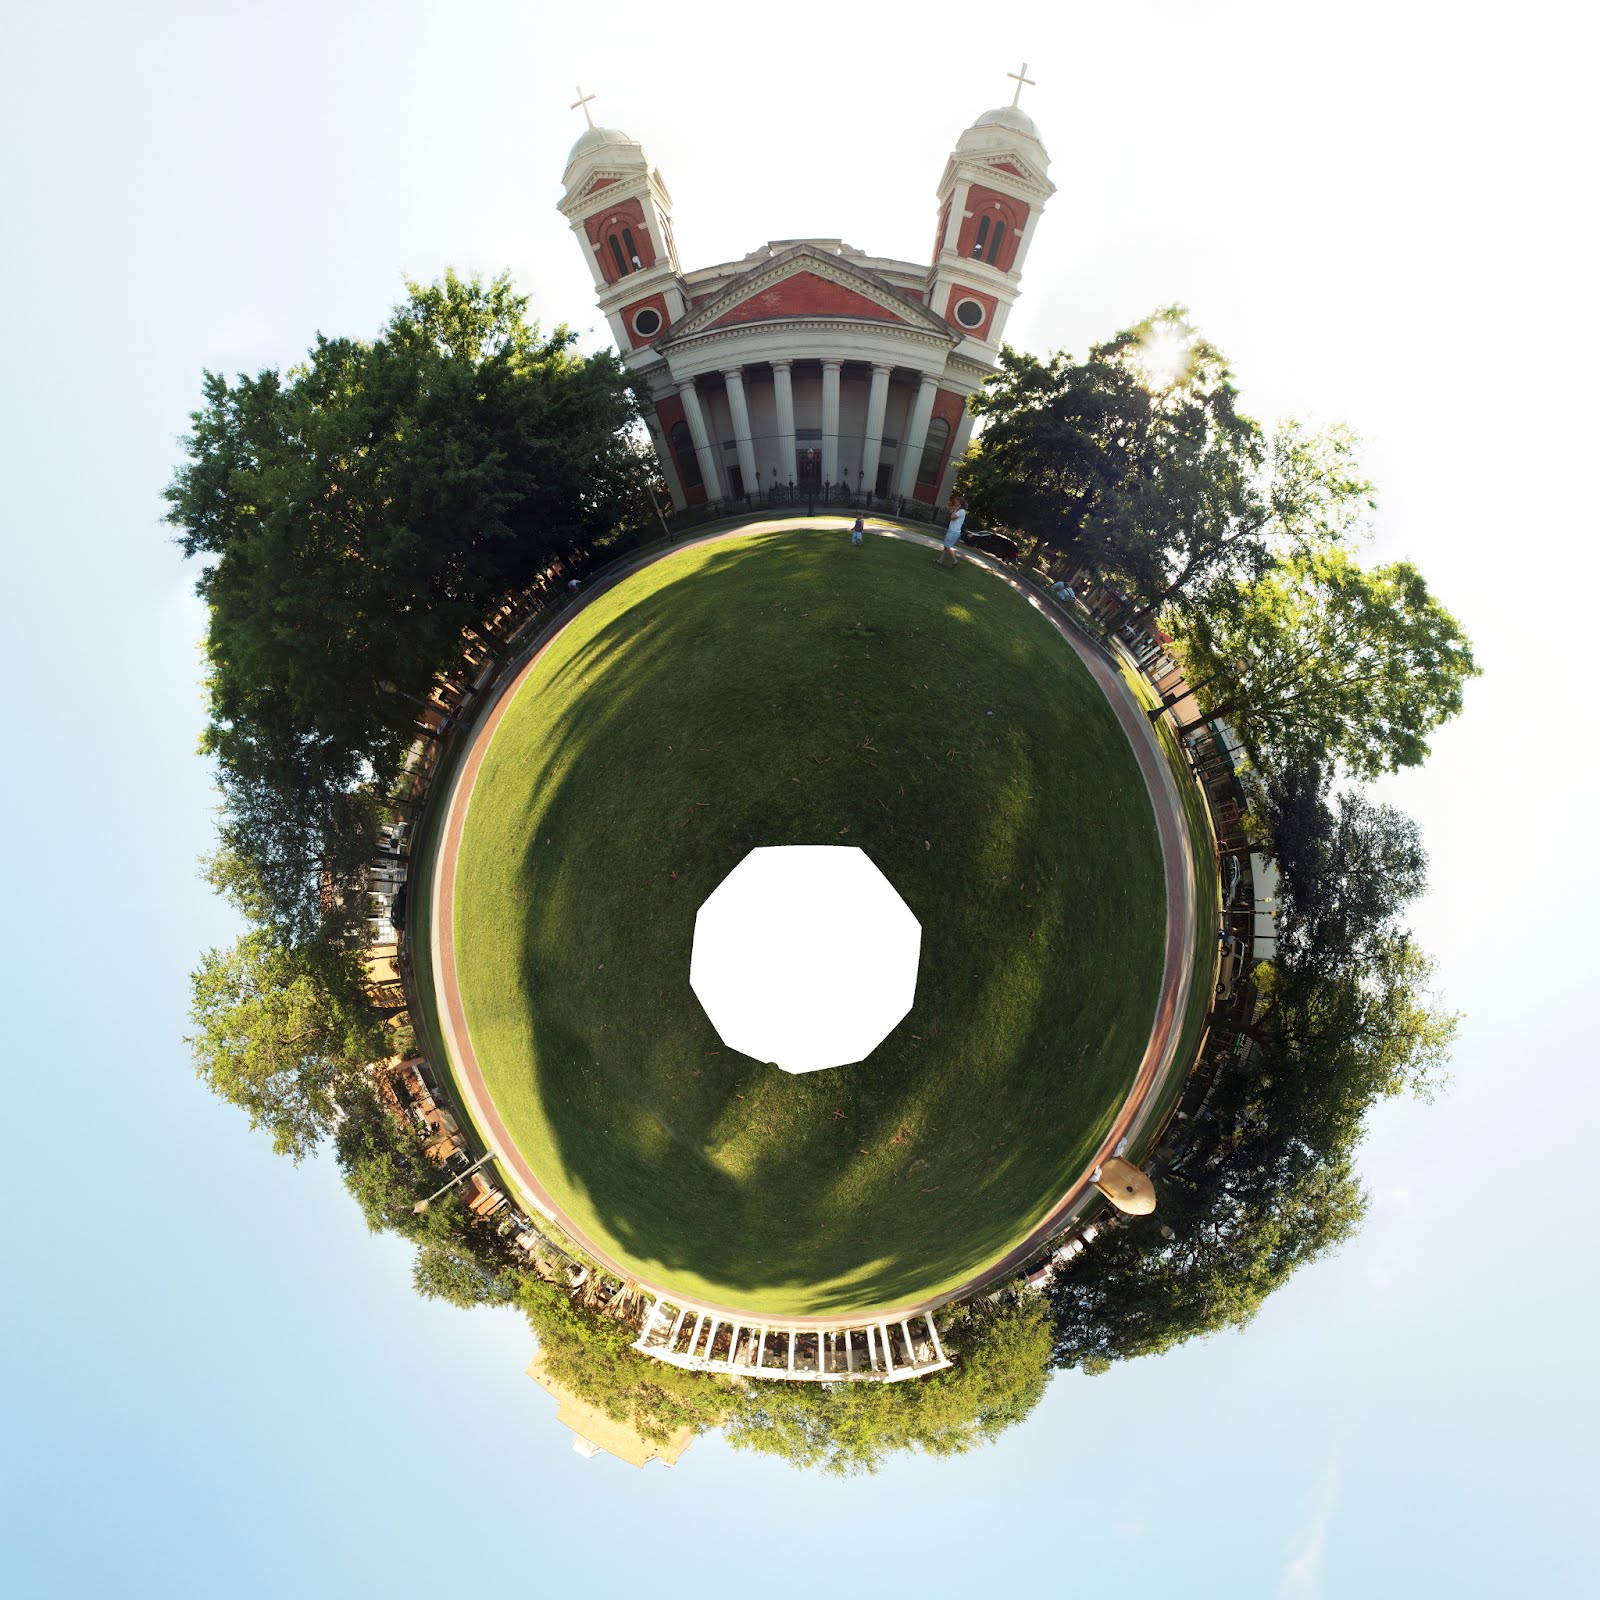
With the nadir frames missing, I can just run Heal Selection on the center of this panorama (2048 squared, set the sample width to 75px), resulting in:

Rebuilding a random grass texture to fill in this nadir is an especially strong feature of Heal Selection, and it shows here.
Another note is that Heal Selection will not fill an area with texture if it is transparent. So if you have a layer with transparency in areas that you want to fill, you’ll have to remember to remove the transparency from that layer first:
In Summary
Heal Selection/Resynthesizer is a killer filter. Due to the nature of GIMP plugins and scripts, it might not be immediately obvious to a new user that this is even an option. (We really need a better method of managing scripts and plug-ins in GIMP).
So here is a small list of links that might help:
- The Resynthesizer page by Paul Harrison
- Resynthesizer entry at the GIMP registry (There is an updated version now. Find it here!)
- Windows installers for various GIMP plugins (including Resynthesier/Heal Selection)
- Partha Bagchi also maintains a few different GIMP versions and plugins (I use his builds personally - particularly my native OSX version)
[Update 2012-12] Over on the GimpChat forums, I walked through how I would approach an example by “slicing” up the area to heal based on surrounding textures. I thought it might be helpful to others who read this post, so check it out here!
Where it Works Well
Anywhere you have a need to fill from a rebuilt texture, and have at least something nearby to sample from. This could be mitigated through creative use of layers to bring appropriate textures closer to your healing area.
Large areas of similar texture, where you want to remove objects. Sky, grass, walls, etc. work very very well to resynthesize textures to heal your selections.
Where it Needs Help
Edges can be problematic to get an automated healing around. This can be mitigated by creative selections and directions for sampling, though. If your only other option is a lot of time with the clone and heal tool, then this method shouldn’t be any harder or take any longer. (ie: try this first to help you get on your way to a clean heal).
If you’ve had a chance to try this filter out, please feel free to share the links with us in the comments below!