Getting Around in GIMP - Blue Channel Check Layer (Retouching)
In my previous post for the Open Source Portrait (Postprocessing), I had mentioned during the skin retouching in GIMP section that there was a method that I had used in the past for helping to make skin imperfections visible for healing.
It is a similar method described by Calvin Hollywood (again), that he calls “Check Layers”. He explains what they are and how he uses them in the video below:
If you don’t want to watch the video, the basic idea came about from my experience when converting images to B&W. That is, the Blue channel of a color image is not flattering at all for skin (unless you have flawless skin). Conversely, the Red channel usually has very pretty skin tones (and hence it’s common to overlay a Red channel on your image and set it to Overlay blend mode to enhance this).
What Calvin Hollywood shows in his video is using a Photoshop adjustment layer to turn the image into grayscale, and to turn down the contribution from the Red channel, while increasing the Blue channel. This results in a more contrasty image that favors the blue channels, and will make skin imperfections much more visible.
The problem is that we don’t have adjustment layers in GIMP…
The Solution
Well, I had to play around a bit to get things working, but I finally got there.
The trick was to remember that I wanted a view of the Blue channel, in monochrome, and in a way that any touchups I did to the base image would be instantly reflected in my grayscale Blue channel view.
Here’s how to do it (manually, I have also written a script-fu you can download to do this automatically - see below):
- Start with your base layer (or a duplicate).
- Add a new layer over it, fill it with pure Red (255,0,0), layer mode set to Subtract.
- Add another new layer, fill it with pure Green (0,255,0), layer mode set to Subtract.
- Add a new layer over it, fill it with pure Yellow (255,255,0), set layer mode to Subtract. Reader Sebastian pointed out in the comments the (now) obvious fact that Yellow is the complement of blue, so this saves having to make 2 layers of red and green - we can just subtract the complement of blue: Yellow.
- Add another new layer, fill it with White (255,255,255), layer mode set to Color.
- Add another new layer, fill it with Grey (127,127,127), layer mode set to Dodge.
- Now work with your healing brush on your base layer, and changes will show in realtime.
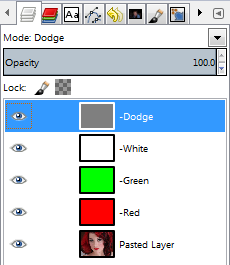
When I’m done adding layers, this is what my layer palette would look like:

After adding all my layers
I can now work with a healing/clone brush on my base layer, and I’ll see the changes reflected in real time on my canvas in GIMP.
If I want to see the progress of my work on the full color image, I can use a simple shortcut: Shift-Click (⌘-Click) on the base layer visibility to isolate it as the only visible layer, and again to turn all layers back on.
Here is a quick video of me walking through using this method:
A nice bonus to this method is that it will also work above a set of Wavelet Decompose scales, meaning you can use a normal wavelet workflow, and still use this “Check Layer” to get a view of what you’re doing against the Blue channel.
Finally, it can be tedious to create all of these layers manually each time you want to use it, so I’ve written a Script-Fu to automate it. You can find it at registry.gimp.org:
