
Film Emulation Presets in G'MIC (GIMP)
Color toning/grading can be a heck of a rabbit-hole sometimes. You start innocently enough, but hours later you’ll find yourself still fiddling with one particular point in one particular channel. Just a little bit more to get it just right! Just a slight bump to saturation in this color! Push the hue a little more this way!


It may seem trivial, but these tiny differences can mean the world to obsessive-compulsive types. I’m speaking from experience because I just finished clawing my way out of the rabbit hole…
I brought some things back with me, though.
An update and addendum on new film emulations can be found here.
A method for saving the presets for use while offline can be found here: Using G’MIC Film Emulation Filters Offline.
What Came Back
You might recall that I talked about color curves a couple of times in the past. In my previous post on color curves & skin, I looked at Petteri Sulonen’s curves, and walked through a process for matching color tones from other images. There was a lot of back and forth between Sample Points and the Curves editor.
It’s a pretty good description of the process, and with enough time and patience you can come up with some pretty good curves. If you’re feeling really ambitious, you can also start fiddling with Hue, Saturation, and Value as well (something curves alone can’t really do for you).
In an effort to practice and learn even more about color and tone manipulations, I figured it would be fun to replicate the effects found in a very popular set of film emulation presets that are available commercially…
The problem is, I tend to only use F/OSS in my workflow, so I don’t have Photoshop, Lightroom, Adobe Camera Raw, or Aperture. Which also means I don’t have a means to access those presets directly.
What I do have is (some) patience and examples online. I also know enough about color manipulation to be dangerous (and annoying as hell to people smarter than me).

So I basically walked through re-creating many of the popular film emulations that people seem to like so much these days. (This is where I spent a LOT of time fiddling, see the first paragraph of this post again).
To make things easier on myself I generated a full set of 16-bit Hald CLUT images, thus allowing me to apply these color emulations to my images with Imagemagick. (I may come back and post more about this later).
The problem I had is that it’s more fun to share this with others, and I wasn’t sure of an easy way to do this (seriously, each Hald CLUT image to re-create the effect weighs in at 50MB each).
I wanted an easy way to share these presets and let others play with them…
Enter G’MIC (David Tschumperlé)
Lucky for me, I’m friends with David Tschumperlé.
If you need yet another reason to go download and support G’MIC, here it is. Within 24 hours of asking if there was a way to do this, he had something ready to go. (See, it’s good to know smart people).

A few hours after that, and all of the emulations I worked on can now be accessed in G’MIC.
So, that’s my announcement. My film emulation presets are now available in GIMP, thanks to David and G’MIC.
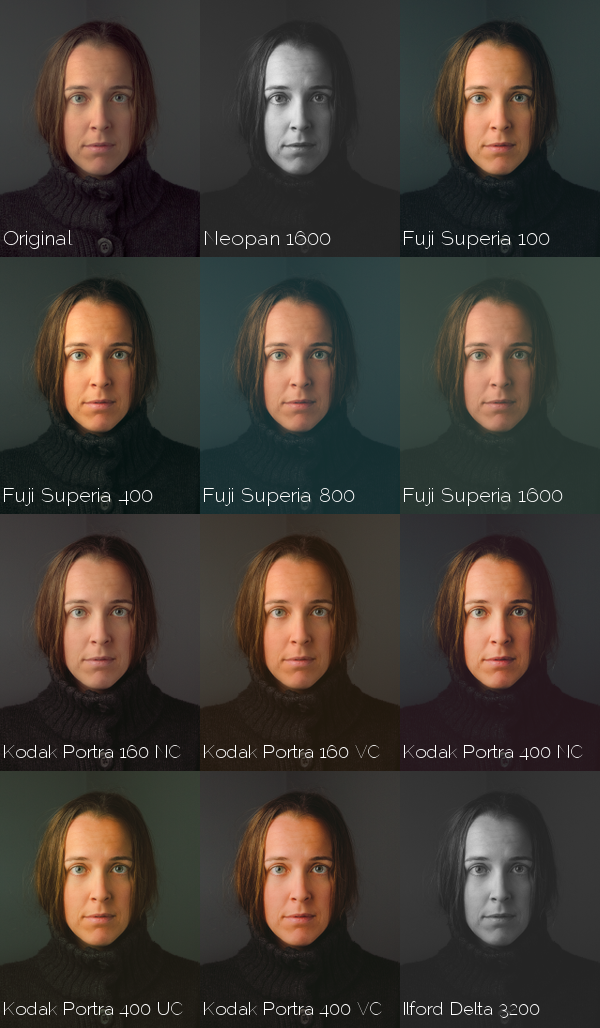
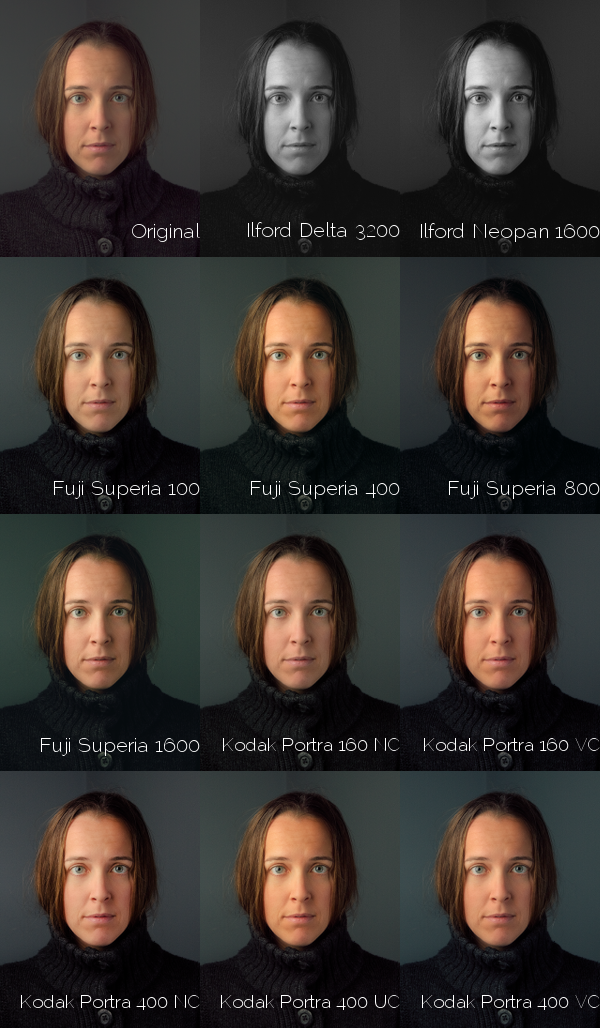
Here’s a sample of the “old” film stocks there are now presets for:
The best part is, if you are reading this post, and have a recent G’MIC installed, you already have them at your disposal right now .
All you have to do is update the filters in your G’MIC to the latest ones, then:
Filters → G’MIC
then,
Film Emulation → (type)
The Preset list will show all of the color presets I worked on. Under Film Emulation there are sub-categories depending on the type of film stocks you want to use. At the moment they are only broken down by old film stocks vs. new(ish) film stocks. I’m probably going to include some old expired Polaroid stuff I did a while back, and any other instant films I can find as well.
The current list of emulations are:
- Fuji 160C, 400H, 800Z
- Fuji Ilford HP5
- Kodak Portra 160, 400, 800
- Kodak TMAX 3200
- Kodak Tri-X 400
and,
- Fuji Neopan 1600
- Fuji Superia 100, 400, 800, 1600
- Fuji Ilford Delta 3200
- Kodak Portra 160 NC, 160 VC, 400 NC, 400 UC, 400 VC
** [Updated with more]: **
- Polaroid PX-70
- Polaroid PX100UV
- Polaroid PX-680
- Polaroid Time Zero (Expired)
- Fuji FP-100c
- Fuji FP-3000b
- Polaroid 665
- Polaroid 669
- Polaroid 690
All in various intensities of the effect.
Now, these are my approximations, so they aren’t exact. There’s a lot of ‘creative’ interpretations going on, and I had to fill in some things with artistic liberties. They also don’t do any fancy stuff like vignettes and grain, but those are things you can easily do in GIMP.
In fact, I highly recommend the grain map prepared by Petteri Sulonen on his page as an overlay to your images to add the grain. G’MIC also has a synthetic grain generator as well.
Also, as with most automated things, use these as a starting point to experiment and learn more as well. I learned a huge amount about color and HSL manipulations (my eyes bled at one point), while fiddling with these. It’s been an invaluable experience for me, and I hope it will spur more creative experimentation in you.
And hopefully, the next time someone asks “How do I get these colors/tones?”, you can just point them here for a starting point. :)