
2.5D Parallax Animated Photo Tutorial (using Free Software)
I had been fiddling with creating these 2.5D parallax animated photos for quite a few years now, but there had recently been a neat post by Joe Fellows that brought it into the light again.
The reason I had originally played with the idea is part of a long, sad story involving my wedding and an out-of-focus camcorder that resulted in my not having any usable video of my wedding (in 2008). I did have all of the photographs, though. So as a present to my wife, I was going to re-create the wedding with these animated photos (I’m 99% sure she doesn’t ever read my blog - so if anyone knows her don’t say anything! I can still make it a surprise!).
So I had been dabbling with creating these in my spare time over a few years, and it was really neat to see the work done by Joe Fellows for the World Wildlife Fund. Here is that video:
WWF PARALLAX SEQUENCE from Make Productions on Vimeo.
He followed that up with a great video walking through how he does it:
I’m writing here today to walk through the methods I had been using for a while to create the same effect, but entirely with Free/Open Source Software…
Open Source Software Method
Using nothing but Free/Open Source Software, I was able to produce the same effect here:
Joe uses Adobe software to create his animations (Photoshop & After Effects). I neither have, nor want, Photoshop or After Effects.
What I do have is GIMP and Blender!
 =
= 
What I also don’t have (but would like) is access to the World Wildlife Fund photo archive. Large, good photographs make a huge difference in the final results you’ll see.
What I do have access to are some great old photographs of Ziegfeld Follies Girls. For the purposes of this tutorial we’ll use this one:
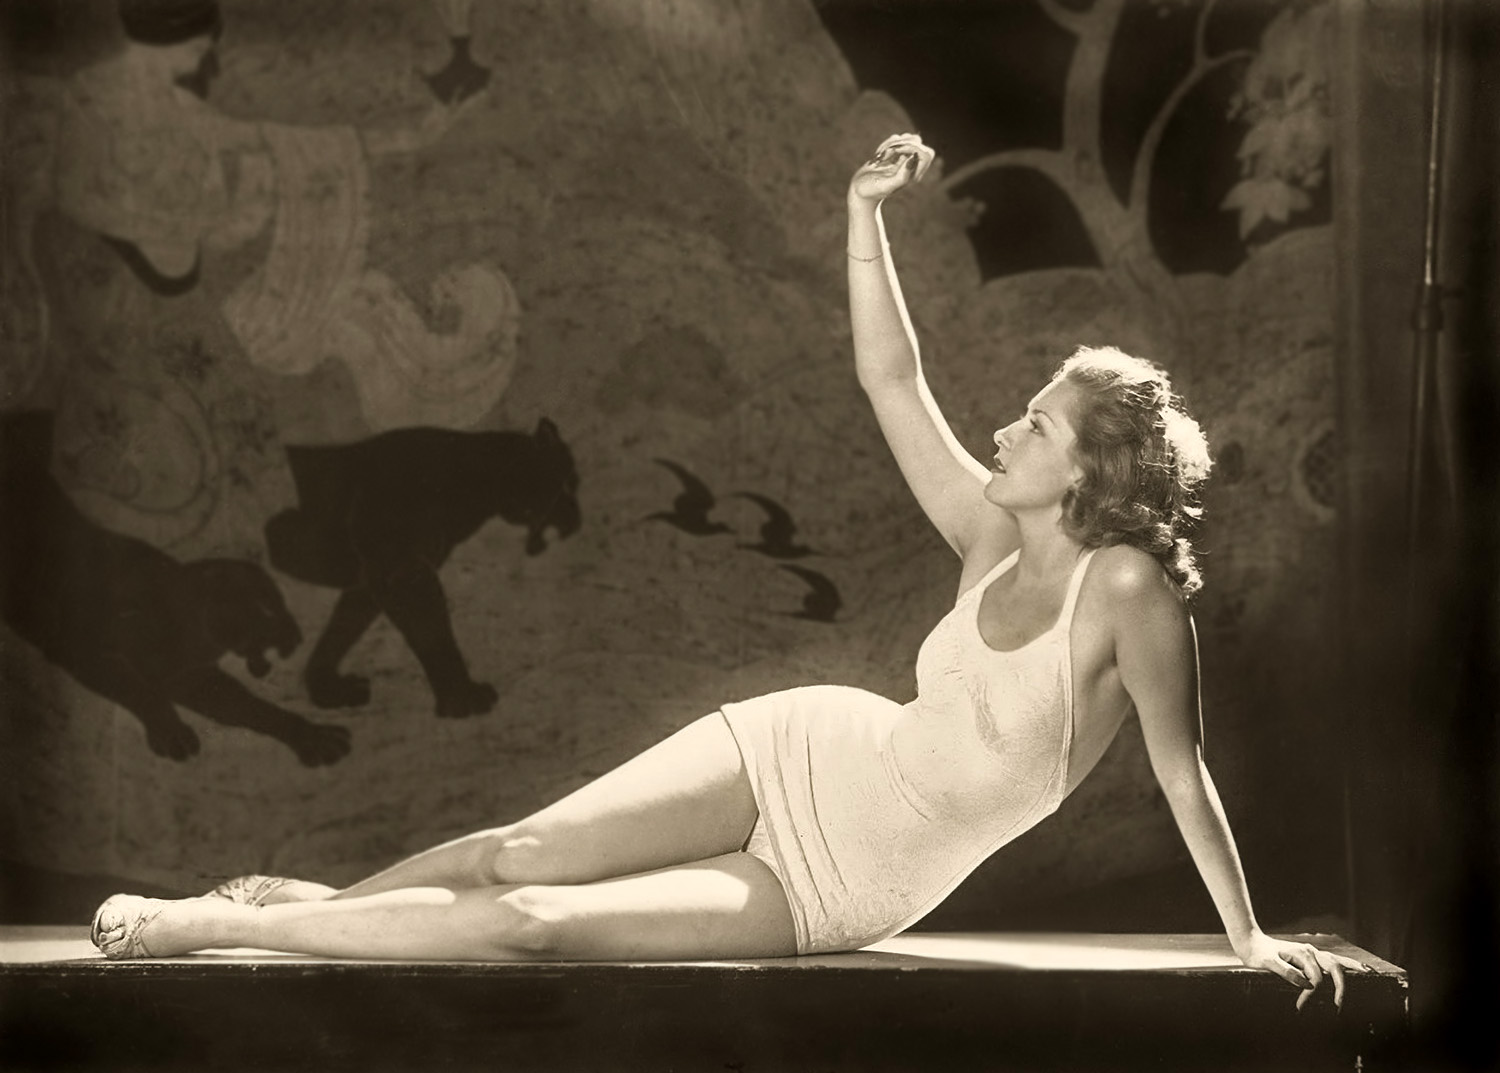
Click here to download the full size image.
This is a long post.
It’s long because I’ve written hopefully detailed enough steps that a completely new user of Blender can pick it up and get something working. For more experienced users, I’m sorry for the length.
As a consolation prize, I’ve linked to my final .blend file just below if anyone wants to download it and see what I finally ended up with at the end of the tutorial. Enjoy!
Here’s an outline of my steps if it helps…
- Pick a good image Find something with good fore/middleground and background separation (and clean edges).
- Think in planes Pay attention to how you can cut up the image into planes.
- Into GIMP
- Isolate woman as new layer Mask out everything except the subject you want.
- Rebuild background as separate layer (automatically or manually) Rebuild the background to exclude your subject.
- Export isolated woman and background layer Export each layer as its own image (keep alpha transparency).
- Into Blender
- Enable "Import Images as Planes" Addon Enable this ridiculously helpful Addon.
- Import Images as Planes Import your image as separate planes using the Addon.
- Basic environment setup Some Blender basics, and set viewport shade mode to "Texture"
- Add some depth Push background image/plane away from camera and scale to give depth.
- Animate woman image mesh Subdivide subject plane a bunch, then add Shape Keys and modify.
- Animate camera Animate camera position throughout timeline as wanted.
- Animate mesh Set keyframes for Shape Keys through timeline.
- Render
File downloads:
- Download the .blend file
These files are being made available under a Creative Commons Attribution, Non-Commercial, Share Alike license (CC-BY-SA-NC). You’re free to use them, modify them, and share them as long as you attribute me, Pat David, as the originator of the file.
Consider the Source Material
What you probably want to look for if you are just starting with these are images with a good separation between a fore/middle ground subject and the background. This will make your first attempts a bit easier until you get the hang of what’s going on. Even better if there are mostly sharp edges differentiating your subject from the background (to help during masking/cutting).
You’ll also want an image bigger than your rendering size (for instance, mine are usually rendered at 1280×720). This is because you want to avoid blowing up your pixels when rendering if possible. This will make more sense later, but for now just try to use source material that’s larger than your intended render size.
Thinking in Planes
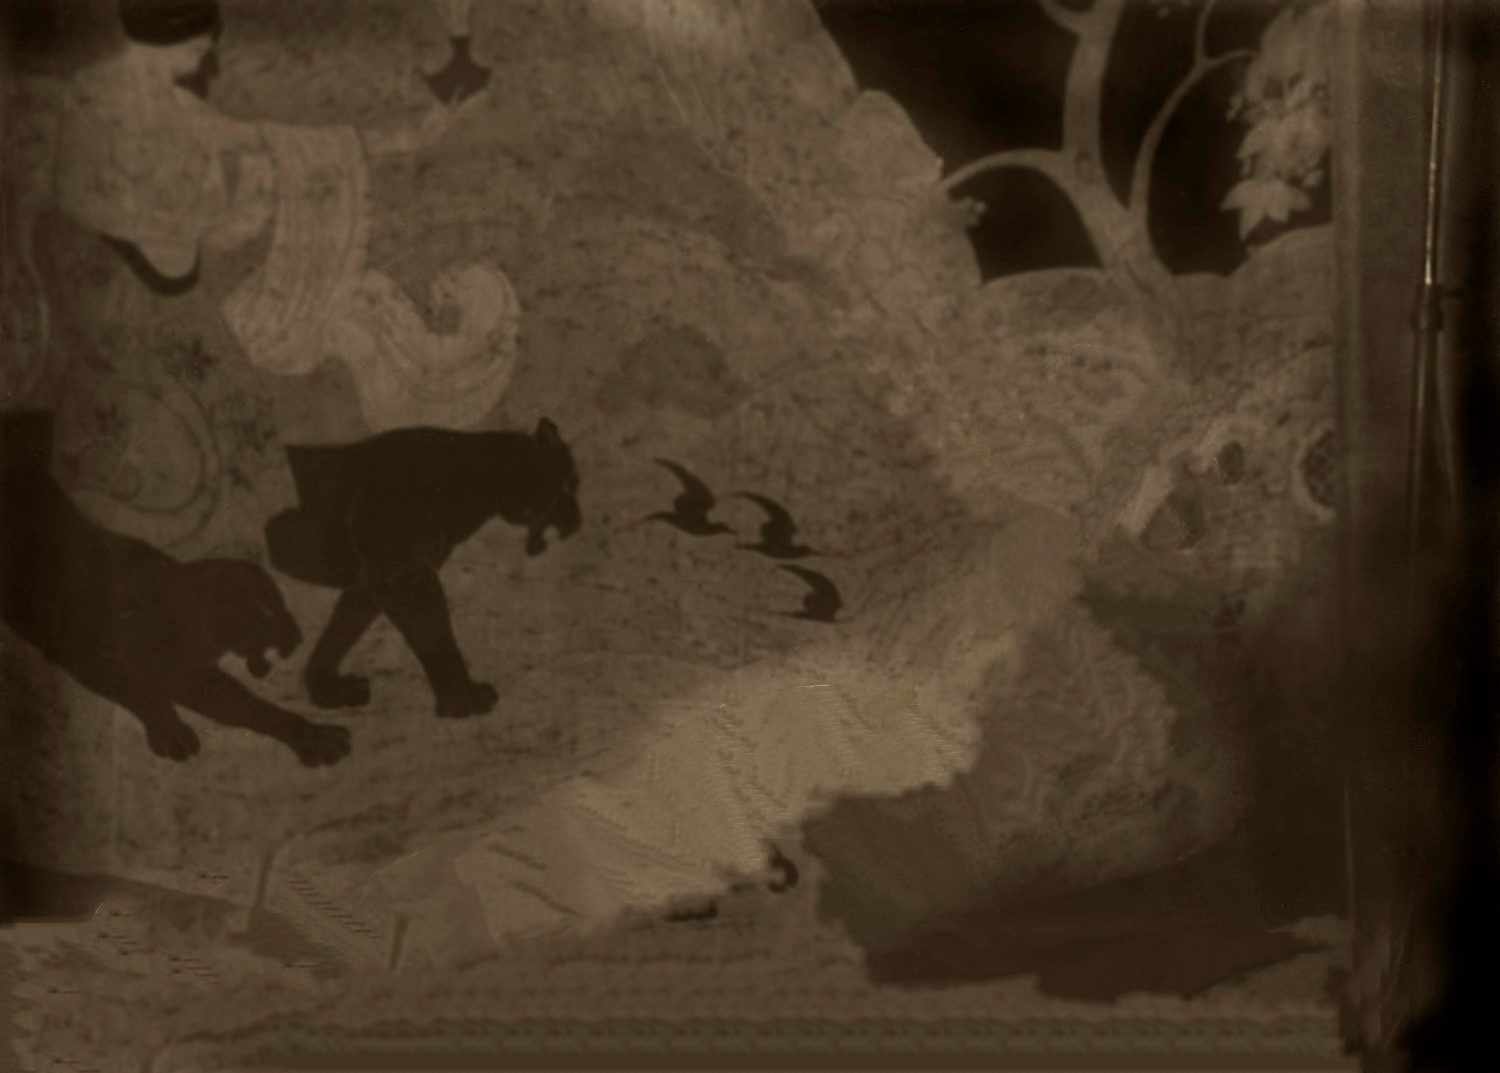
The trick to pre-visualizing these is to consider slicing up your image into separate planes. For instance, with our working image, I can see immediately that it’s relatively simple. There is the background plane, and one with the woman/box:
Simple 2-plane visualization of the image.
This is actually all I did in my version of this in the video. This is nice because for the most part the edges are all relatively clean as well (making the job of masking an easier one).
One of my previous tests had shown this idea of planes a little bit clearer:
Yes, that’s my daughter at the grave of H.P. Lovecraft with a flower.
So we’ve visualized a simple plan - isolate the woman and platform from the background. Great!
Into GIMP!
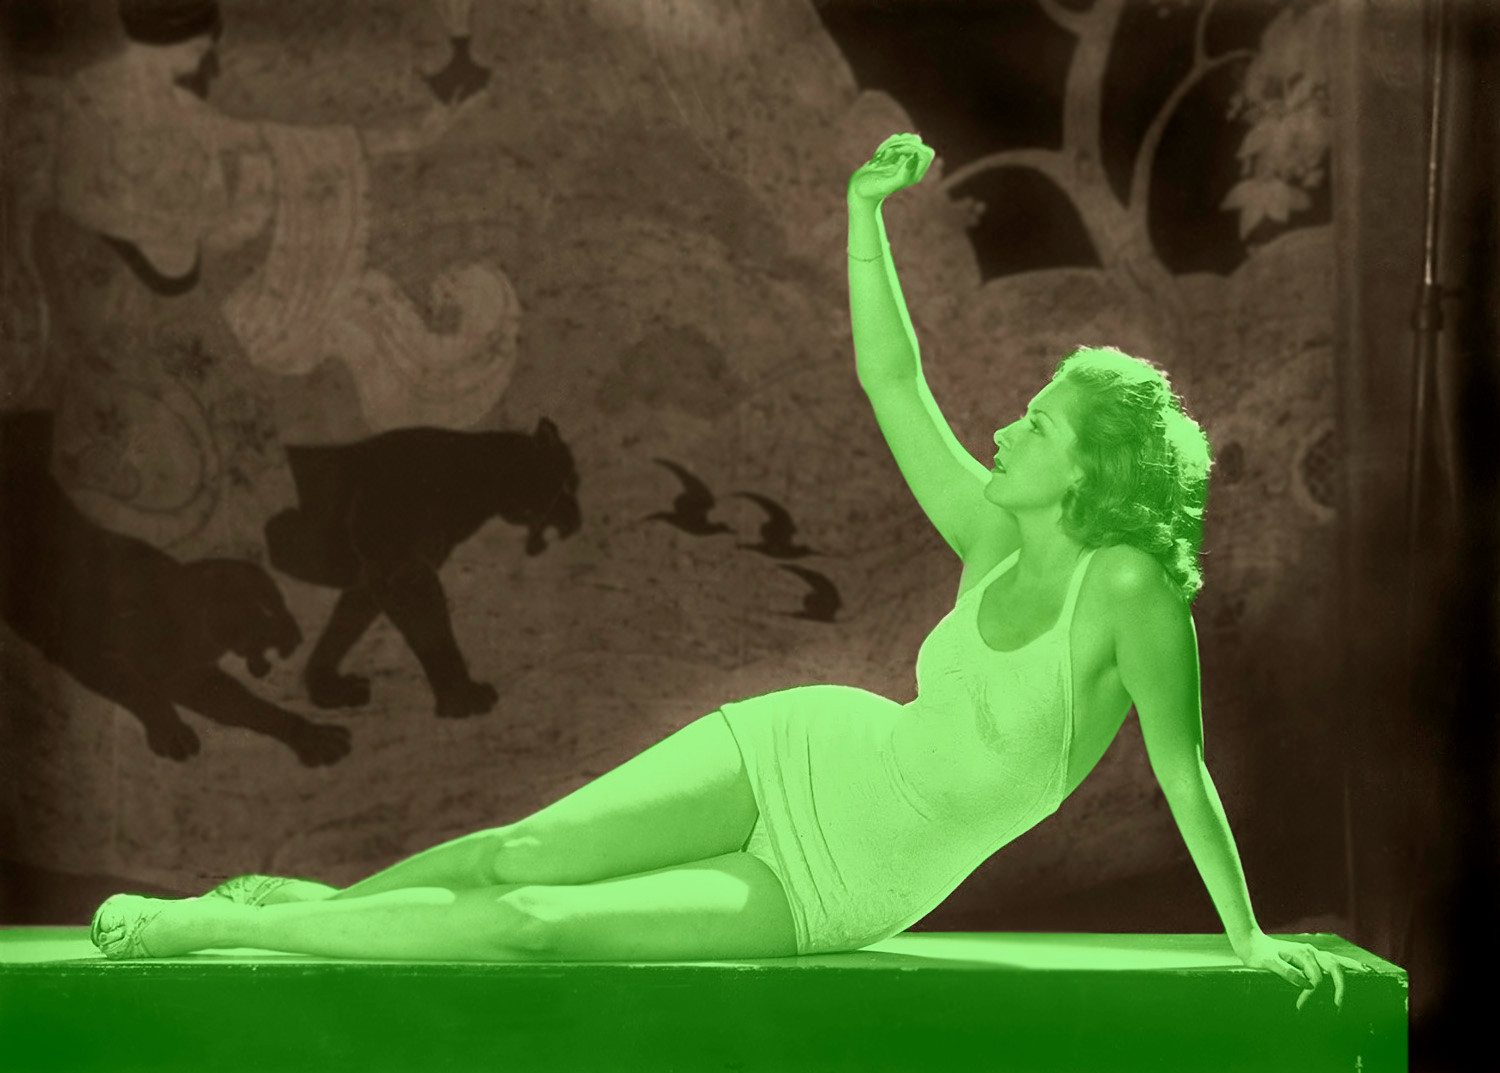
So I will simply open the base image in GIMP to do my masking and exporting each of the individual image planes. Remember, when we’re done, we want to have 2 images, the background and the woman/platform (with alpha transparency):
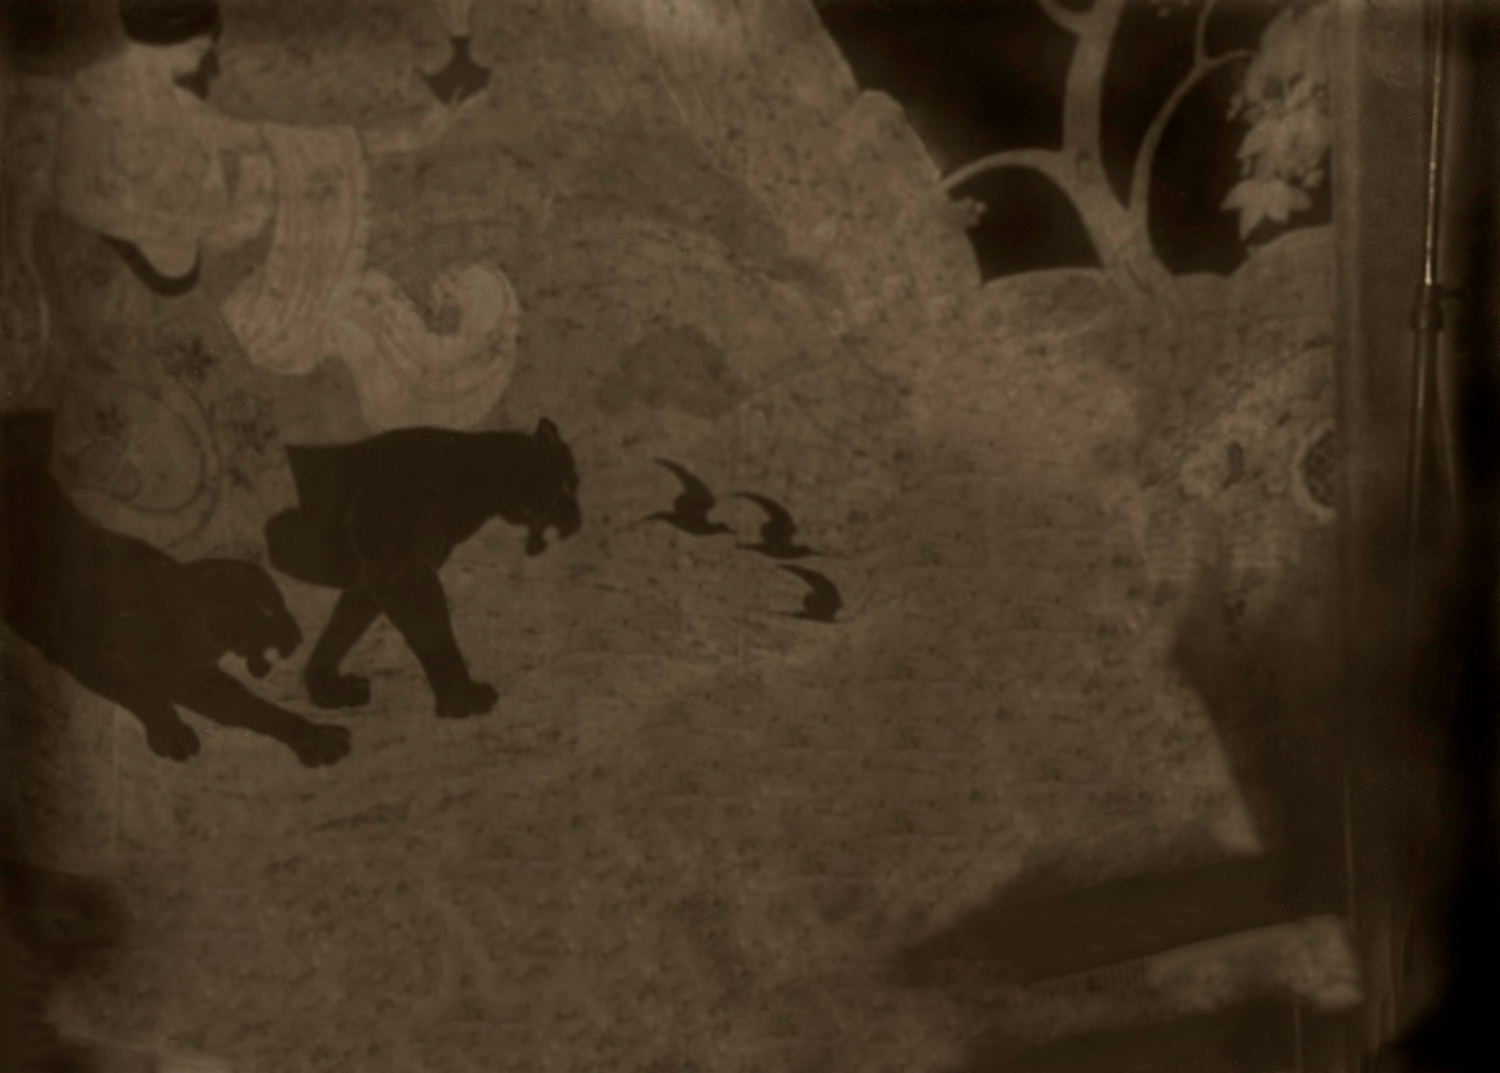
What my final cleaned up backplate should look like.

My isolated woman/platform image.
Get Ready to Work
Once in GIMP I will usually duplicate the base image layer a couple of times (this way I have the original untouched image at the bottom of layer stack in case I need it or screw up too badly). The top-most layer is the one I will be masking the woman from. The middle layer will become my new background plate.
Isolating the Woman
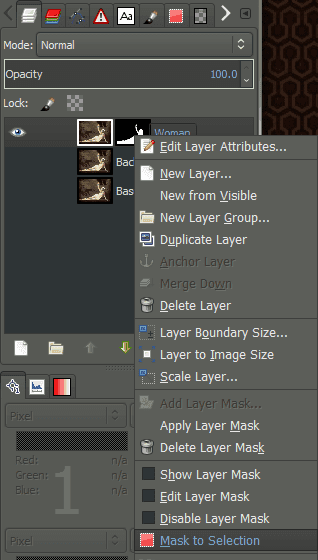
To isolate the woman, I’ll need to add a Layer Mask to the top-most layer (if you aren’t familiar with Layer Masks, the go back and read my previous post on them to brush up.
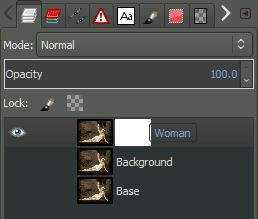
I initialize my layer mask to White (full opacity). Now anywhere I paint black on my layer mask, will make that area transparent on this layer. I also usually turn off the visibility of all the other layers when I am working (so I can see what I’m doing - otherwise the layers beneath would show through and I wouldn’t know where I was working). This is what my layer dialog looks like at this point:
Masking the Woman
Some of these headings are beginning to sound like book titles (possibly romance?) “Isolating the Woman”, “Masking the Woman”…
There’s a few different ways you can proceed at this point to isolate the woman. Really it depends on what you’re most comfortable with. One way is to use Paths to trace out a path around the subject. Another way is to paint directly on the Layer Mask.
All of them suck.
Sorry. There is no fast and easy method of doing this well. This is also one of the most important elements to getting a good result, so don’t cheap out now. Take your time and pull a nice clean mask, whatever method you choose.
For this tutorial, we can just paint directly onto our Layer Mask. Check to make sure the Layer Mask is active (white border around it that you won’t be able to see because the mask is white) in the Layer palette, and make sure your foreground color is set to Black. Then it’s just a matter of choosing a paintbrush you like, and start painting around your subject.
I tend to use a simple round brush with a 75% hardness. I’ll usually start painting, then take advantage of the Shift key modifier to draw straight lines along my edges. For finer details I’ll drop down into a really small brush, and stay a bit larger for easier things.
To illustrate, here’s a 3X speedrun of me pulling a quick mask of our image:
To erase the regions that are left, I’ll usually use the Fuzzy Select Tool, grow the selection by a few pixels, and then Bucket Fill that region with black to make it transparent (you can see me doing it at about 2:13 in the video).
Now I have a layer with the woman isolated from the background. I can just select that layer and export it to a .PNG file to retain transparency.
File → Export
Name the file with a .png extension, and make sure that the “Save color values from transparent pixels” is checked to save the alpha transparency.
Rebuilding the Background
Now that you have the isolated woman as an image, it’s time to remove her and the platform from the background image to get a clean backplate. There’s a few ways to go about this, the automated way, or the manual way.
Automated Background Rebuild
The automated way is to use an Inpainting algorithm to do the work for you. I had previously written about using the new G’MIC patch-based Inpainting algorithm, and it does a pretty decent job on this image. If you want to try this method you should first read up about using it here (and have G’MIC installed of course).
To use it in this case was simple. I had already masked out the woman with a layer mask, so all I had to do was Right-Click on the layer mask, and choose “Mask to Selection” from the menu.
Then just turn on the visibility of my “Background” layer (and toggle the visibility of the isolated woman layer off) and activate my “Background” layer by clicking on it.
Then I would grow the selection by a few pixels:
Select → Grow
I grew it by about 4 pixels, then sharpened the selection to remove anti-aliasing:
Select → Sharpen
Finally, make sure my foreground color is pure red (255, 0, 0), and bucket fill that selection. Now I can just run the G’MIC Inpainting [patch-based] against it to Inpaint the region:
Filters → G’MIC
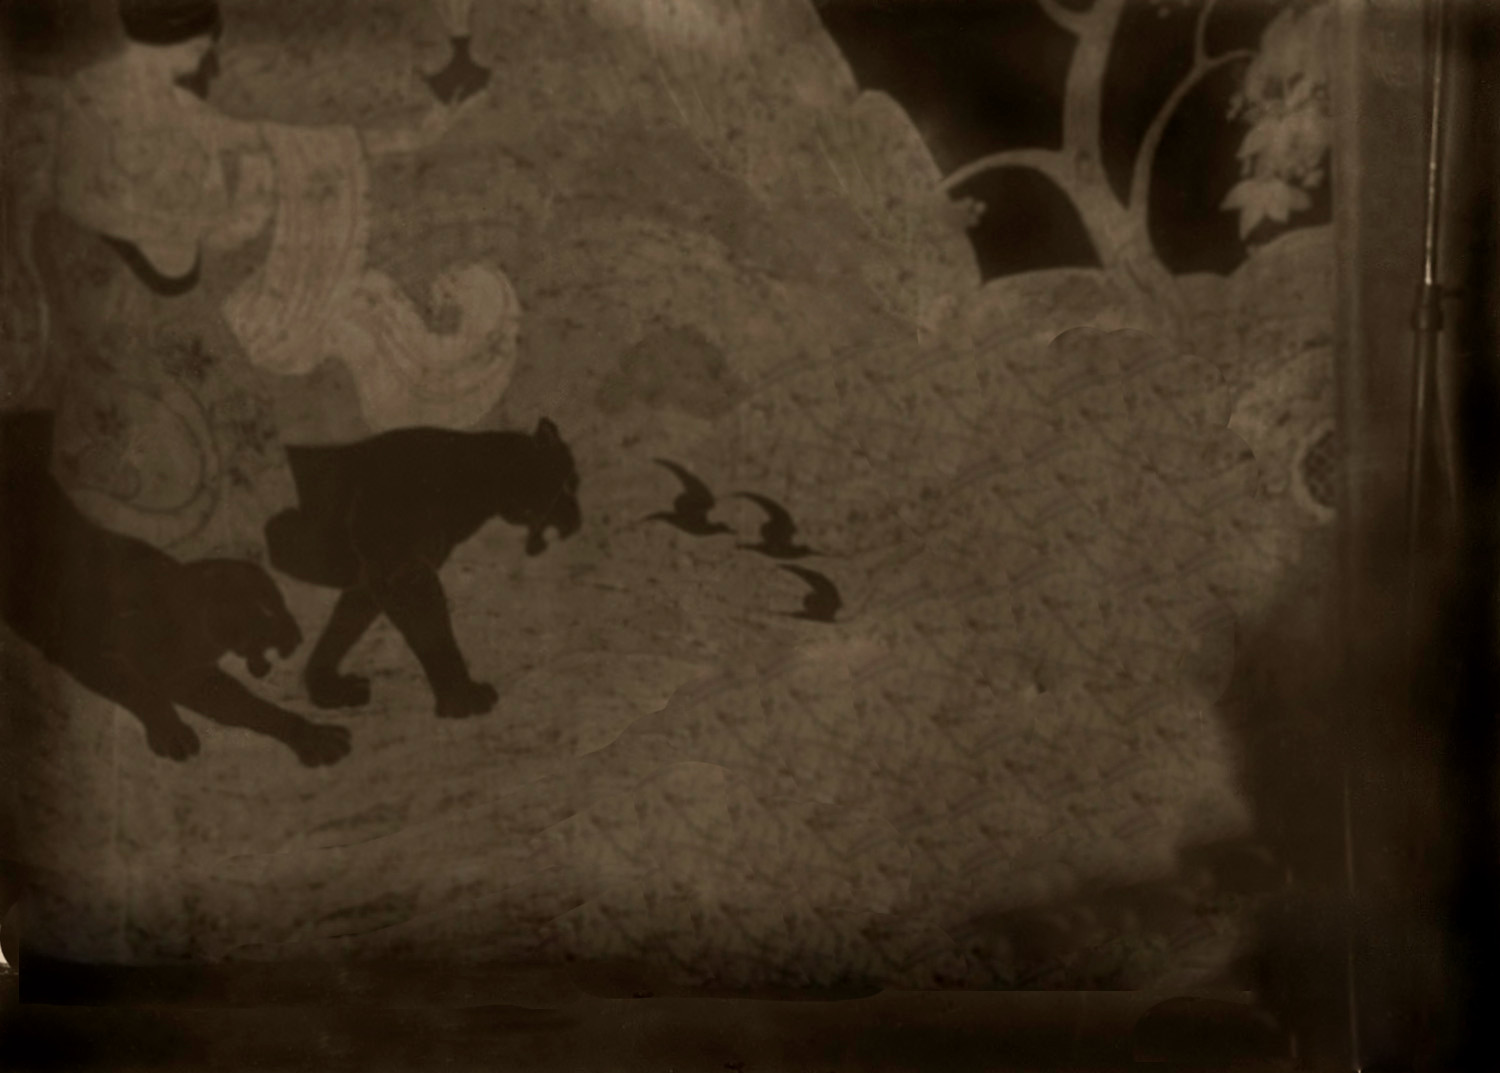
Repair → Inpaint [patch-based] Let it run for a while (it’s intensive), and in the end my layer now looks like this:
Not bad at all, and certainly usable for our purposes!
If I don’t want to use it as is, it’s certainly a better starting point for doing some selective healing with the Heal Tool to clean it up.
Manual Background Rebuild
Manually is exactly as it sounds. We basically want to erase the woman and platform from the image to produce a clean background plate. For this I would normally just use a large radius Clone Tool for mostly filling in areas, and then the Heal Tool for cleaning it up to look smoother and more natural.
It doesn’t have to be 100% perfect, remember. It only needs to look good just behind the edges of your foreground subjects (assuming the parallax isn’t too extreme). Not to mention one of the nice things about this workflow is that it’s relatively trivial later to make modifications and push them into Blender.
Rinse & Repeat
For this tutorial we are now done. We’ve got a clean backplate and an isolated subject that we will be animating. If you wanted to get a little more complex just continue the process starting with the next layer closer to the camera. An example of this is the last girl in my video, where I had separated her from the background, and then her forearm from her body. In that case I had to rebuild the image of her chest that was behind her forearm to account for the animation.
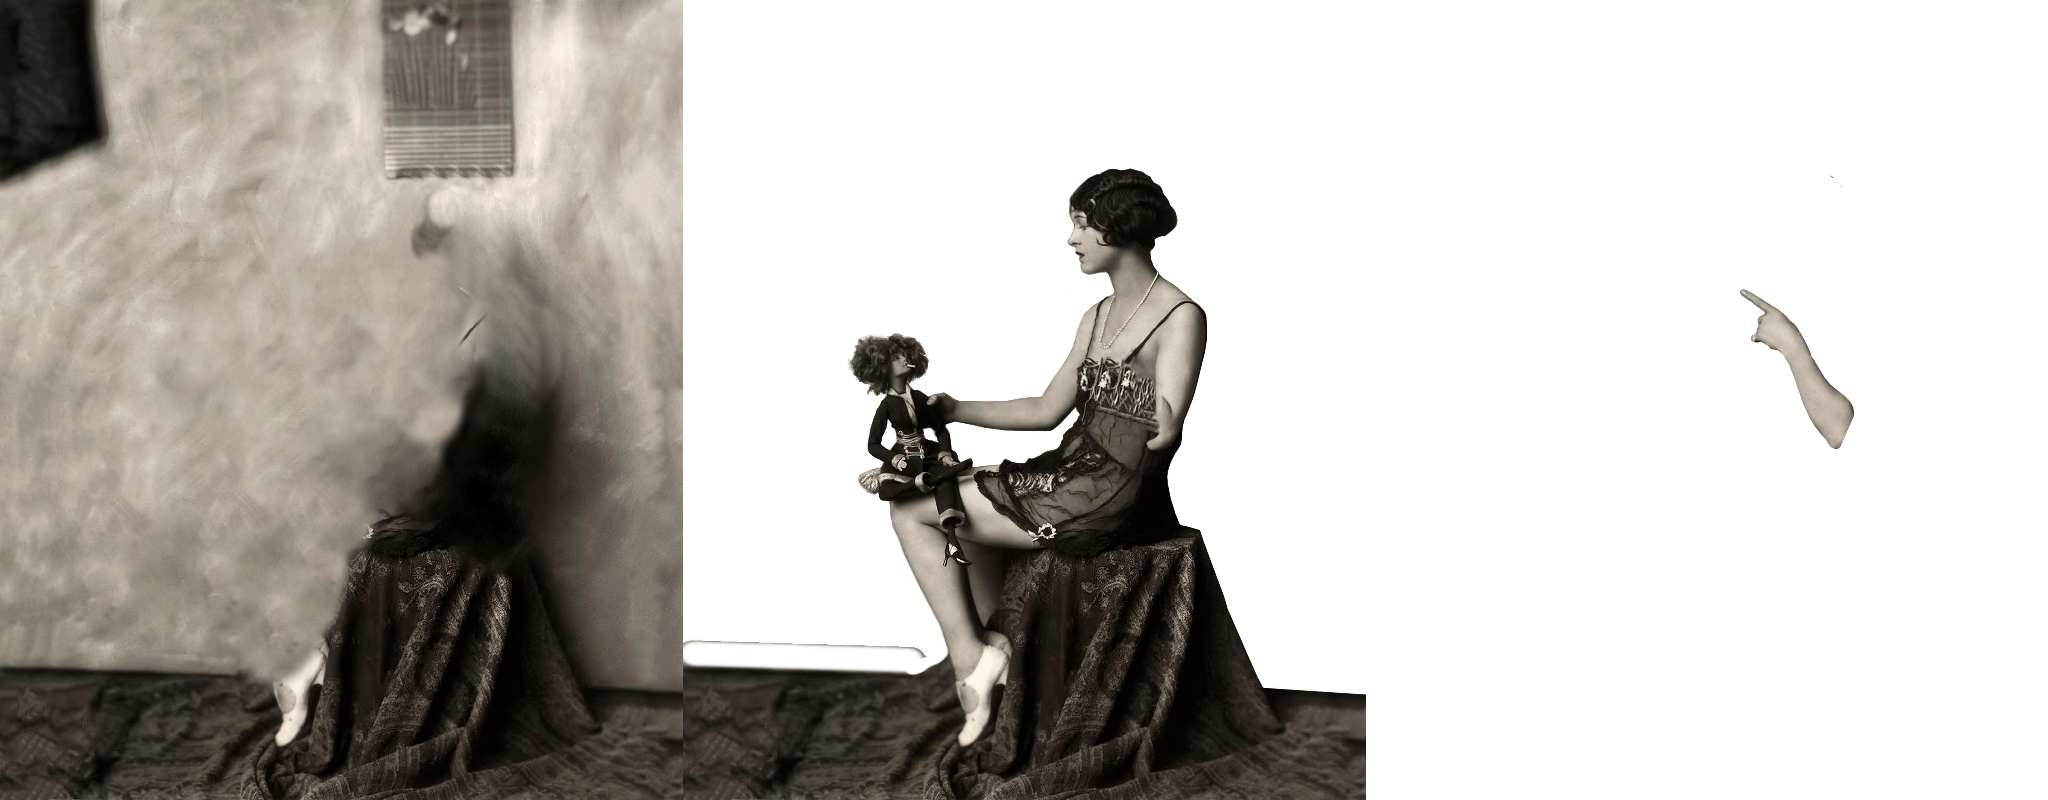
Example of a three-layer separation (notice the rebuilt dress texture)
Into Blender
Now that we have our source material, it’s time to build some planes. Actually, this part is trivially easy thanks to the Import Images as Planes Blender addon.
The key to this addon is that it will automatically import an image into Blender, and assign it to a plane with the correct aspect ratio.
Enable Import Images as Planes
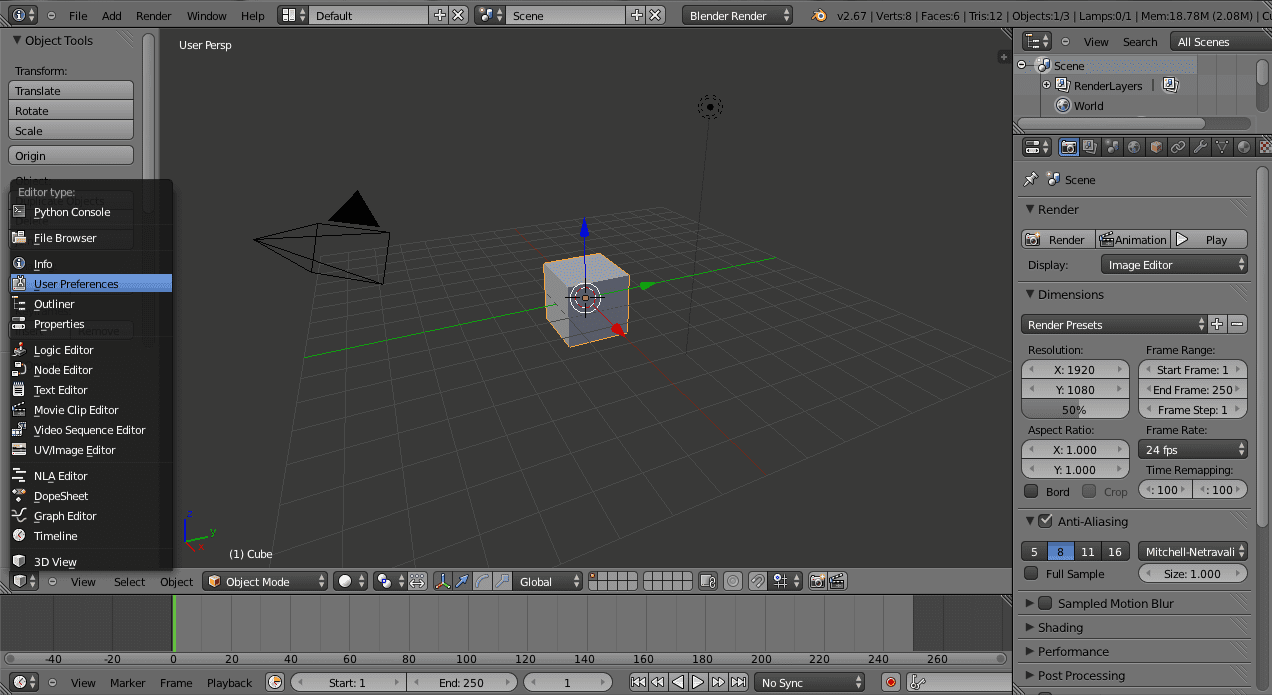
This addon is not enabled by default (at least in my Blender), so we just need to enable it. You can access all of the addons by first going to User Preferences in Blender:
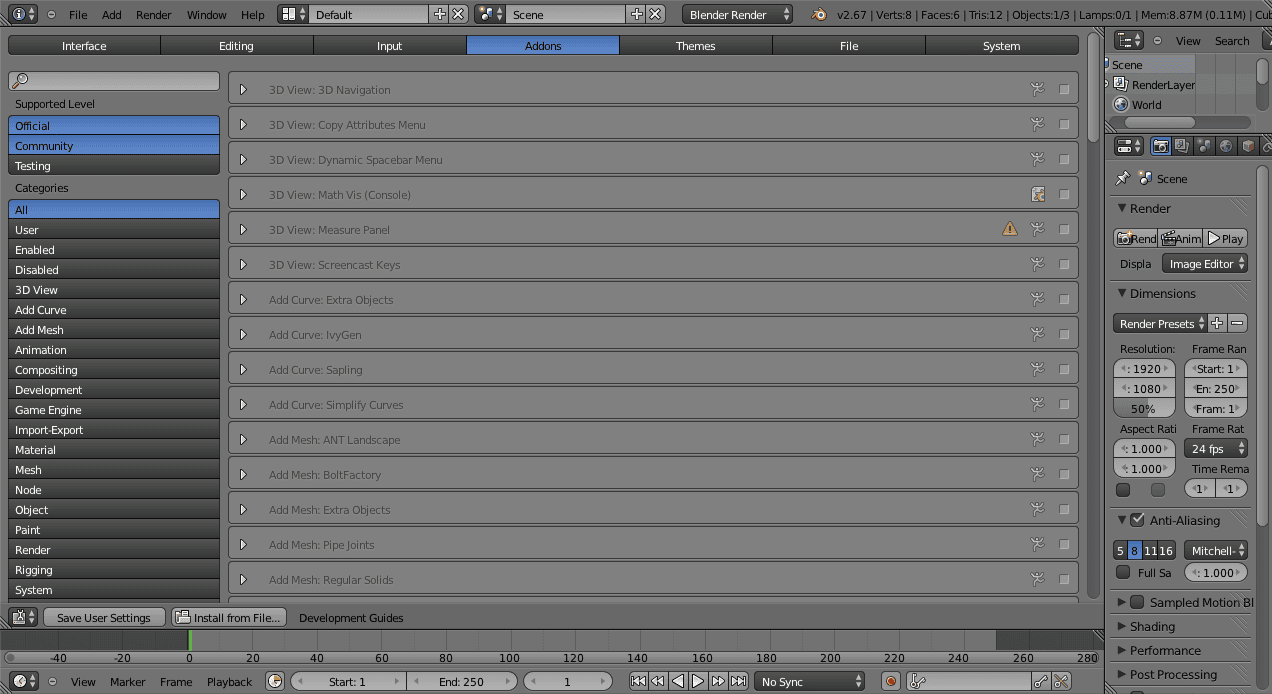
Then into the Addons window:
I find it faster to get what I need by searching in this window for “images”:
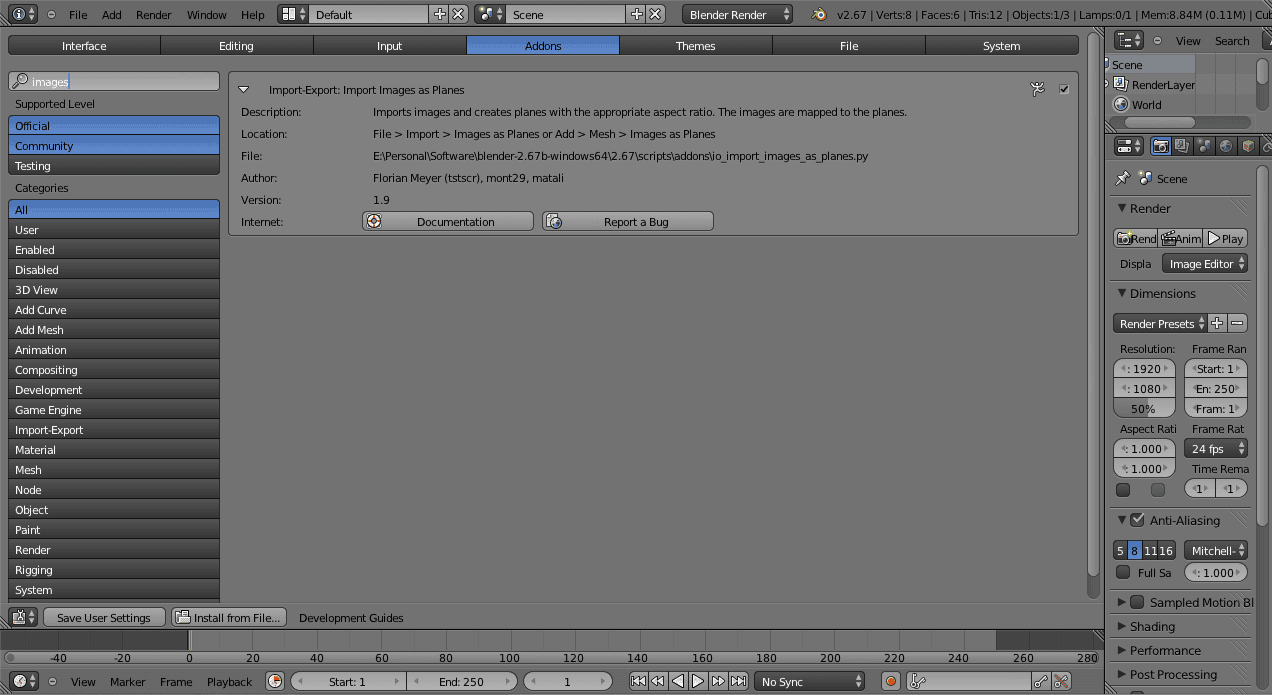
To enable the Addon, just put check the small box in the upper right corner of the Addon. Now you can go back into the 3D View.
Back in the 3D View, you can also select the default cube and lamp (Shift - Right Click), and delete them (X key). (Selected objects will have an orange outline highlighting them).
Import Images as Planes
We can now bring in the images we exported from GIMP earlier. The import option is available in:
File → Import → Images as Planes
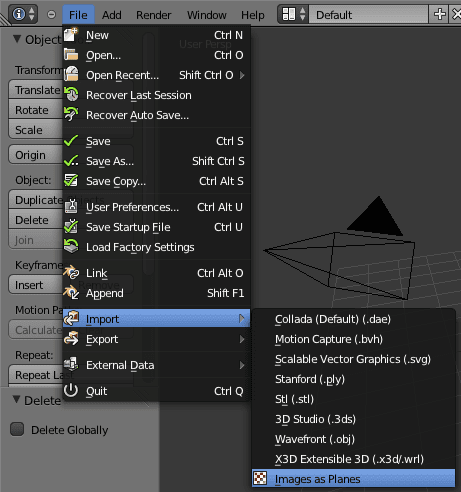
At this point you’ll be able to navigate to the location of your images and can select them for import (Shift-Click to select multiple):
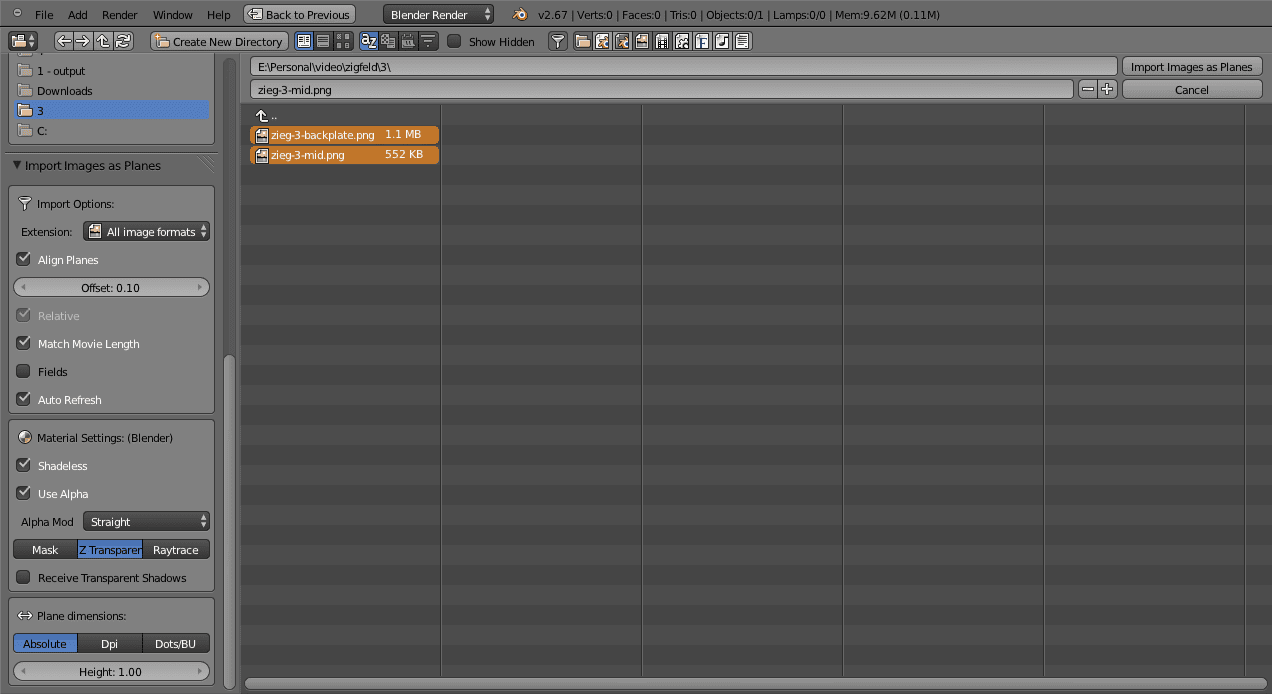
Before you do the import though, have a look at the options that are presented to you (bottom of the left panel). We need to turn on a couple of options to make things work how we want:
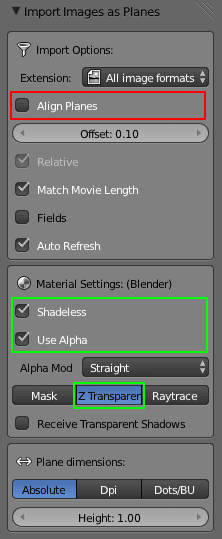
For the Import Options we want to Un-Check the option to “Align Planes”. This will import all of the image planes already stacked with each other in the same location.
Under Material Settings we want to Check both Shadeless and Use Alpha so our image planes will not be affected by lamps and will use the transparency that is already there. We also want to make sure that Z Transparency is pressed.
Everything else can stay at their default settings.
Go ahead and hit the “Import Images as Planes” button now.
Some Basic Setup Stuff
At this point things may look less than interesting. We’re getting there. First we need to cover just a few basic things about getting around in Blender for those that might be new to it.
In the 3D window, your MouseWheel controls the zoom level, and your Middle Mouse button controls the orbit. Right-Click selects objects, and Left-Click will place the cursor. Shift-Middle Click will allow you to pan.
At this point your image planes should already be located in the center of the view. Go ahead and roll your MouseWheel to zoom into the planes a bit more. You should notice that they just look like boring gray planes:
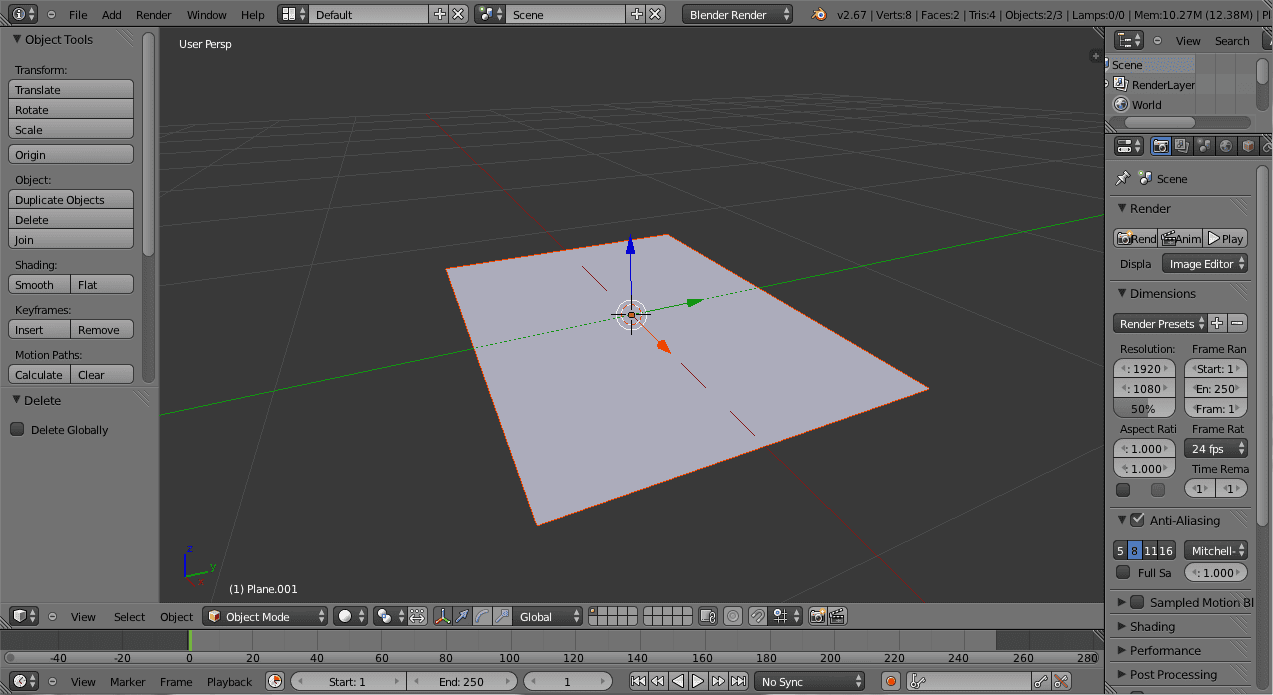
I thought you said we were importing images?!
To see what we’re doing in 3D View, we’ll need to get Blender to show the textures. This is easily accomplished in the toolbar for this view by changing the Viewport Shading:
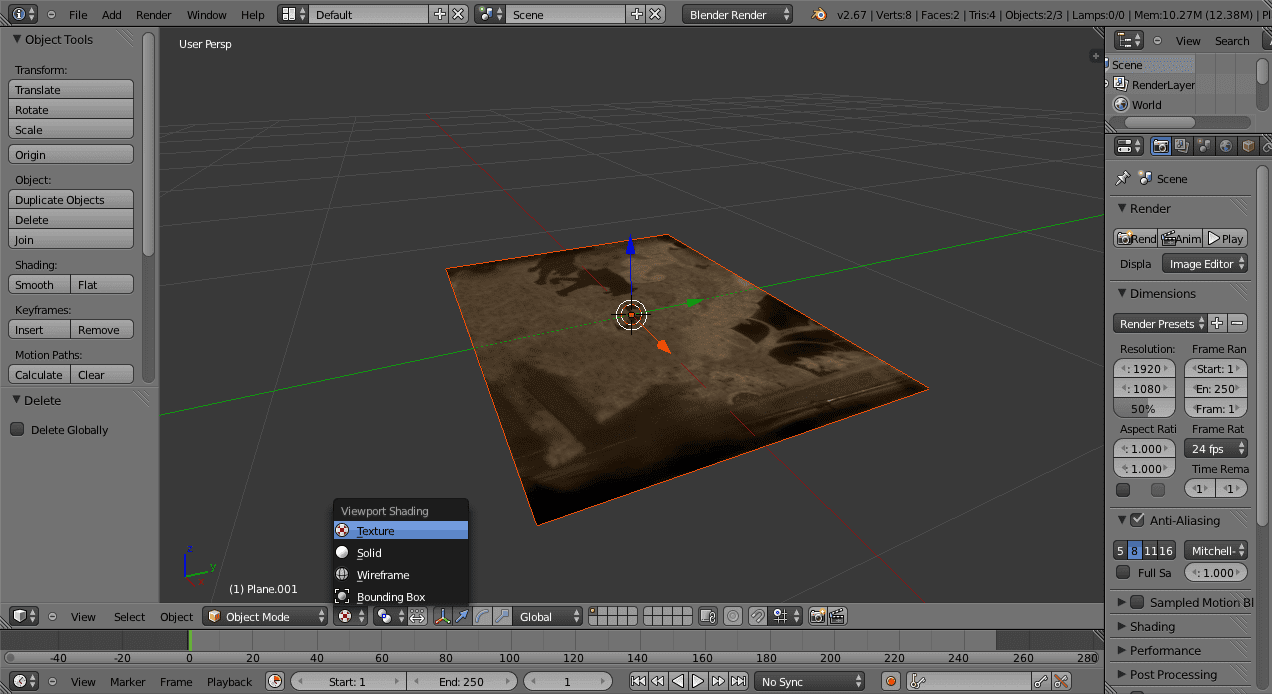
Now that’s more like it!
At this point I personally like to get my camera to an initial setup as well, so zoom back out and Right-Click on your camera:
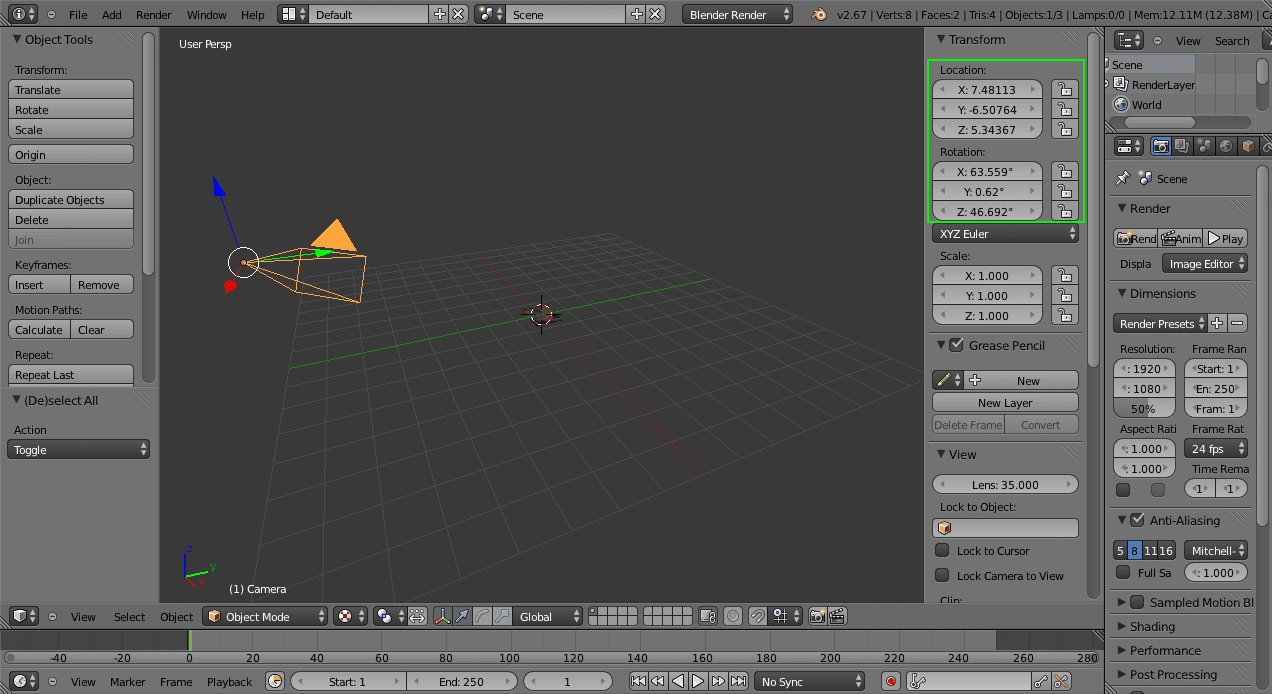
We want to reset all of the default camera transformations and rotations by setting those values to 0 (zero). This will place your camera at the origin facing down.
Now change your view to Camera View (looking through the actual camera) by hitting zero (0) on your keyboard numberpad (not 0 along the top of your alpha keys).
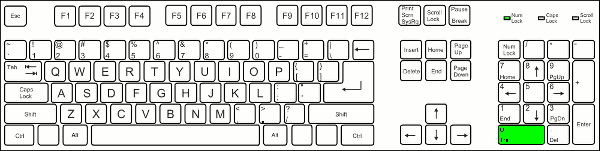
Yes, this zero, not the other one!
You’ll be staring at a blank gray viewport at this point. All we have to do now is move the camera back (along the Z-axis), until we can see our working area. I like to use the default Blender grid as a rough approximation of my working area.
To pull the camera back, hit the G key (this will move the active object), and then press the Z key (this will constrain movement along the Z-axis. Slowly pull your mouse cursor away from the center of the screen, and you should see the camera view getting further away from your image planes. As I said, I like to use the default grid as a rough approximation, so I’ll zoom out until I am just viewing the width of the grid:
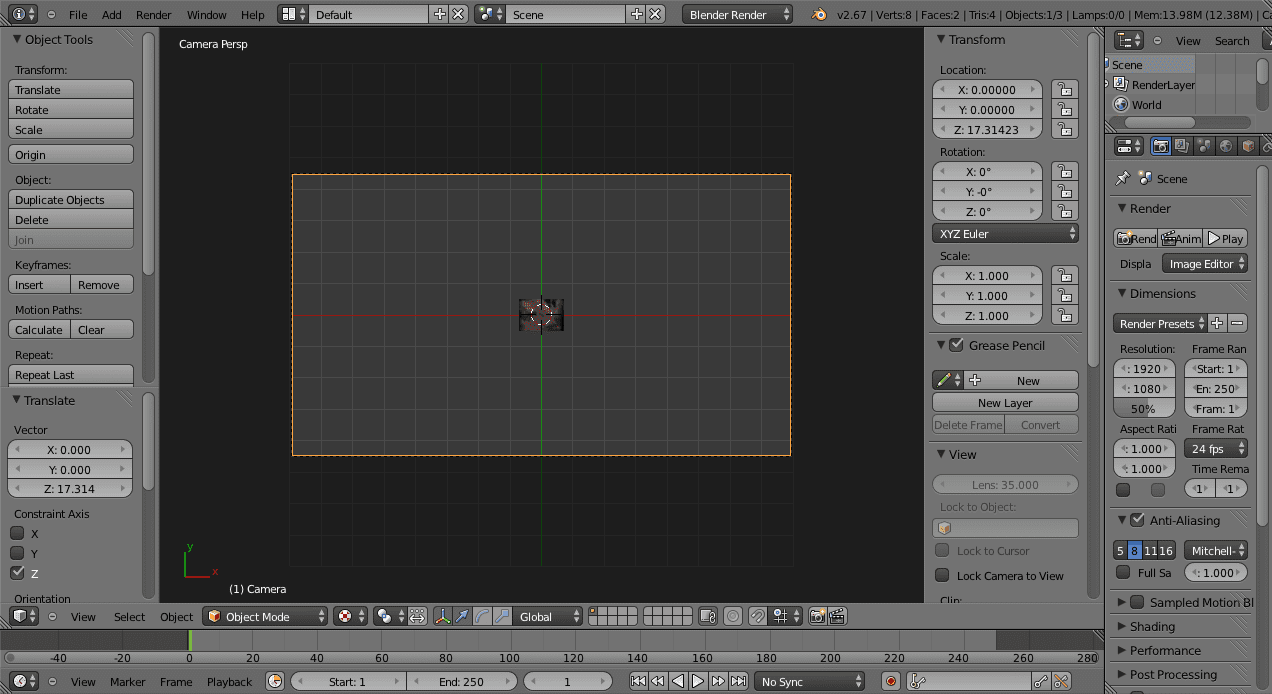
I’ve also found that working at small scales is a little tough, so I like to scale my image planes up to roughly match my camera view/grid. So we can select all the image planes in the center of our view by pressing the B key and dragging a rectangle over the image planes.
To scale them, press the S key and move the mouse cursor away from the center again. Adjust until the images just fill the camera view:
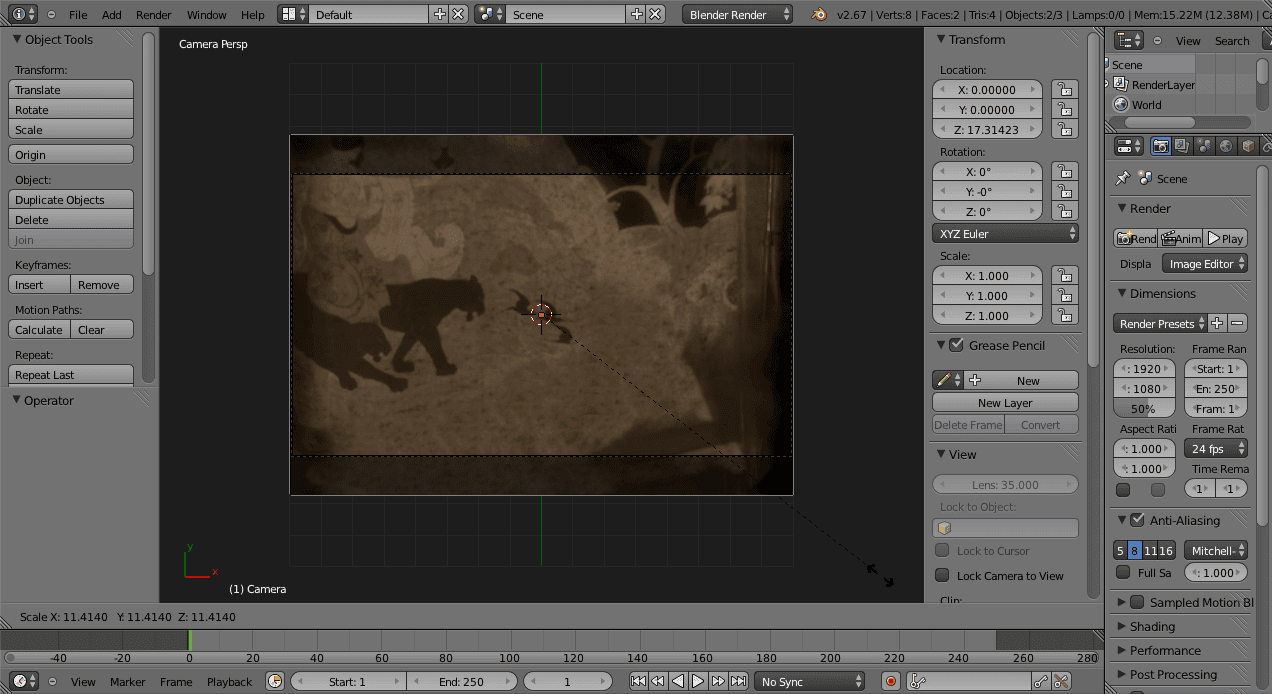
Image planes scaled up to just fit the camera/grid
This will make the adjustments a little easier to do. Now we’re ready to start fiddling with things!
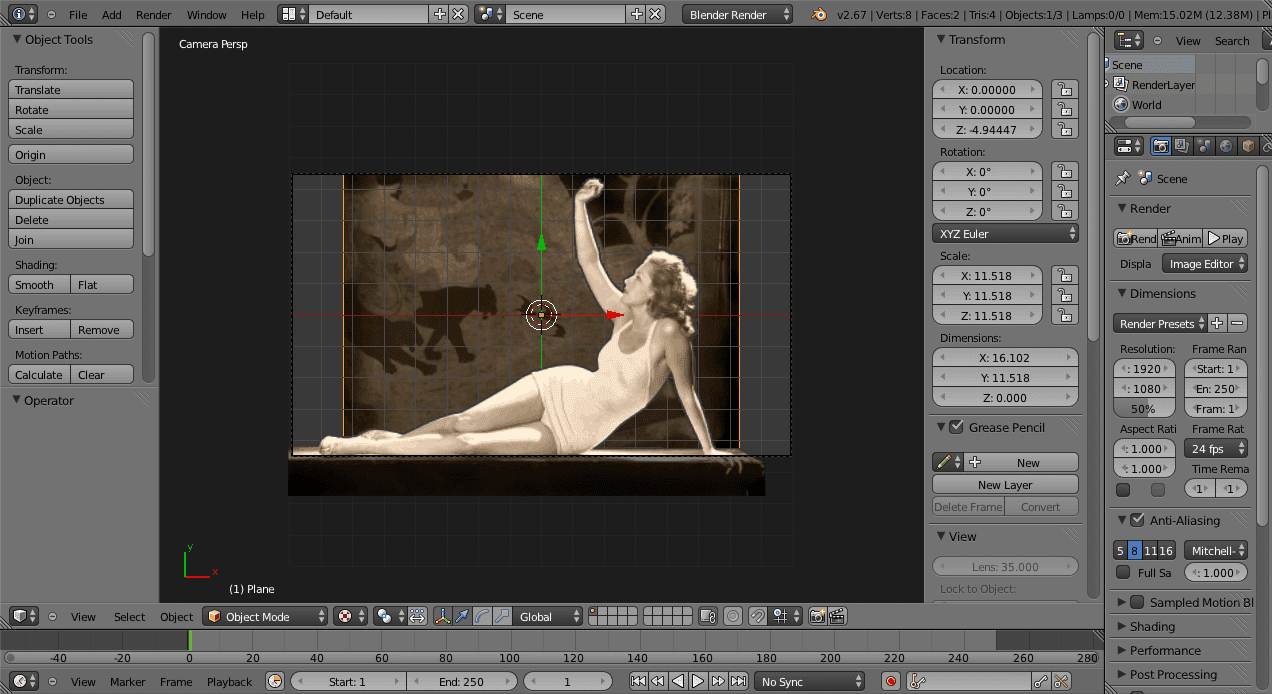
Adding Some Depth
What we have now is all of our image planes in the exact same location. What we want to do is to offset the background image further away from the camera view (and the other planes).
Right-click on your image planes. If you click multiple times you will cycle through each object under your cursor (in this case between the background/woman image planes). With your background image plane selected, hit the G key to move it, and the Z key again to constrain movement along the Z-axis. (If you find that you’ve accidentally selected the woman image plane, just hit the ESC key to escape out of the action).
This time you’ll want to move the mouse cursor towards the center of the viewport to push the background further back in depth. Here’s where I moved mine to:
We also need to scale that image plane back up so that its apparent size is similar to what it was before we pushed it back in depth. With the background image plane still selected, hit the S key and pull the mouse away from the center again to scale it up. Make it around the same size as it was before (a little bigger than the width of the camera viewport):
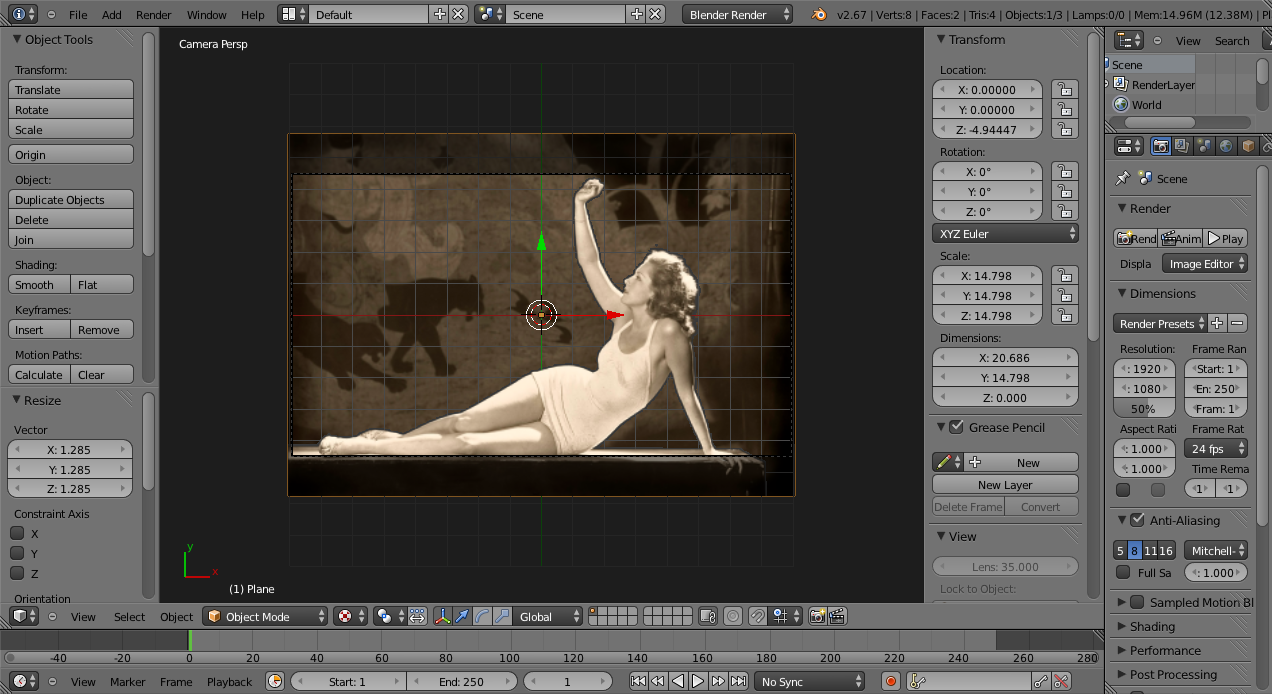
Keep in mind that the further back the background plane is, the more pronounced the parallax effect will be. Use a relatively light touch here to maintain a realistic sense of depth.
What’s neat at this point is that if we were not going to animate any of the image planes themselves, we would be about done. For example, if you select the camera again (Right-click on the camera viewport border) you can hit the G key and move the camera slightly. You should be able to clearly see the parallax effect of the background being behind the woman.
Animating the Image Plane
After Effects has a neat tool called “Puppet Tool” that allowed Joe to easily deform his image to appear animated. We don’t have such a tool exactly in Blender at the moment, but it’s trivial to emulate the effects on the image plane using Shape Keys.
What Shape Keys does is simple. You will take a base mesh, add a Shape Key, and then deform the mesh in any way you’d like. Then you can animate the Shape Key deformation of the mesh over time. Multiple Shape Keys will blend together.
We are going to use this function to animate our woman (as opposed to some much more complex animation abilities in Blender).
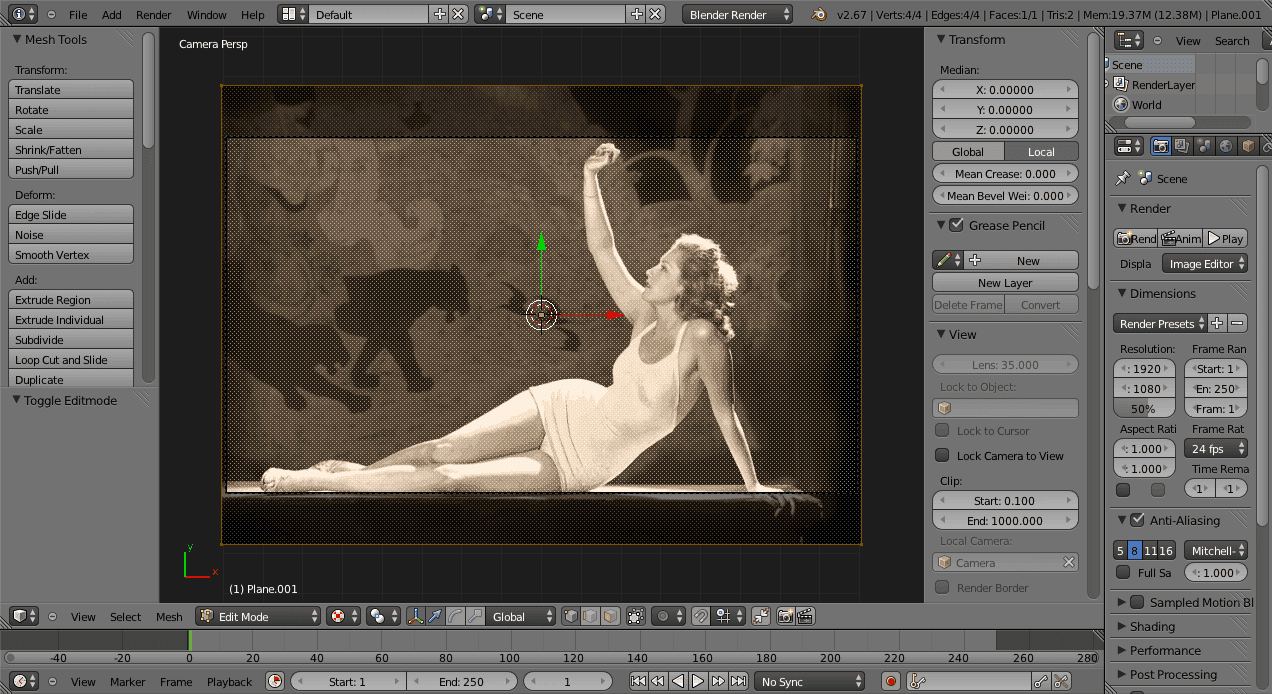
Before we can deform the woman image plane, though, we need a good mesh to deform. At the moment the woman plane contains only 4 vertices in the mesh. We are going to make this much denser before we do anything else.
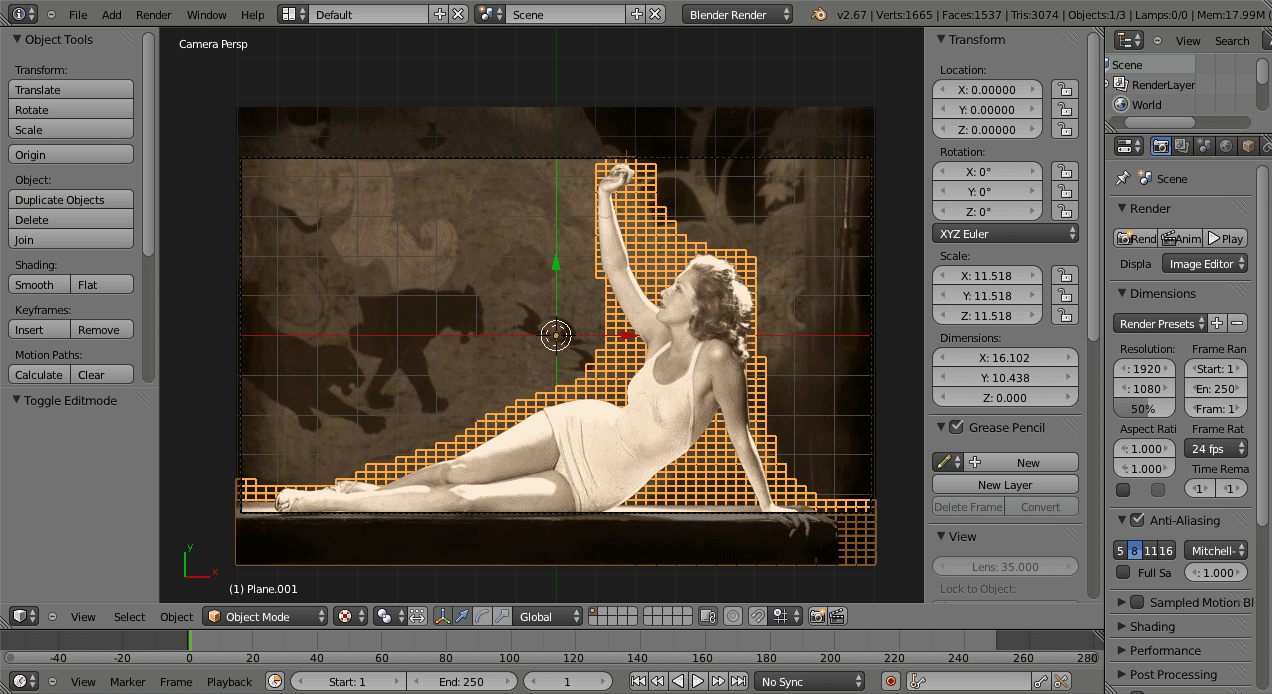
We want to subdivide the image plane with the woman. So Right-click to select the woman image plane. Then hit the Tab key to change into edit mode. All of the vertices should already be active (selected), they will all be highlighted if they are (if not, hit the A key to toggle selection of all vertices until they are):
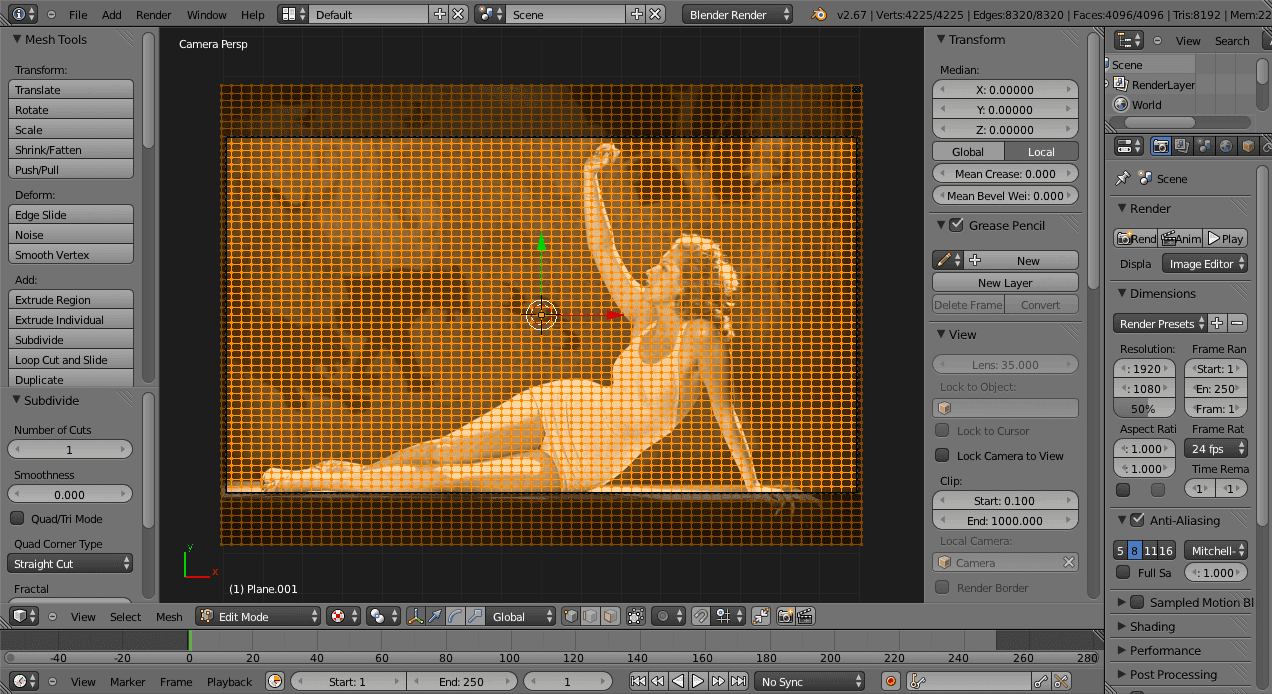
What we want to do is to Subdivide the mesh until we get a desired level of density. With all of the vertices in the plane selected, hit the W key and choose Subdivide from the menu. Repeat until the mesh is sufficiently dense for you. In my case, I subdivided six times and the result looks like this:
If you’ve got a touch of OCD in you, you might want to reduce the unused vertices in the mesh. This is not necessary, but might make things a bit cleaner to look at. To remove those vertices, first hit the A key to de-select all the vertices. Then hit the C key to circle-select. Your should see a circle select region where your mouse is. You can increase/decrease the size of the circle using your MouseWheel. Just click now on areas that are NOT your image to select those vertices:
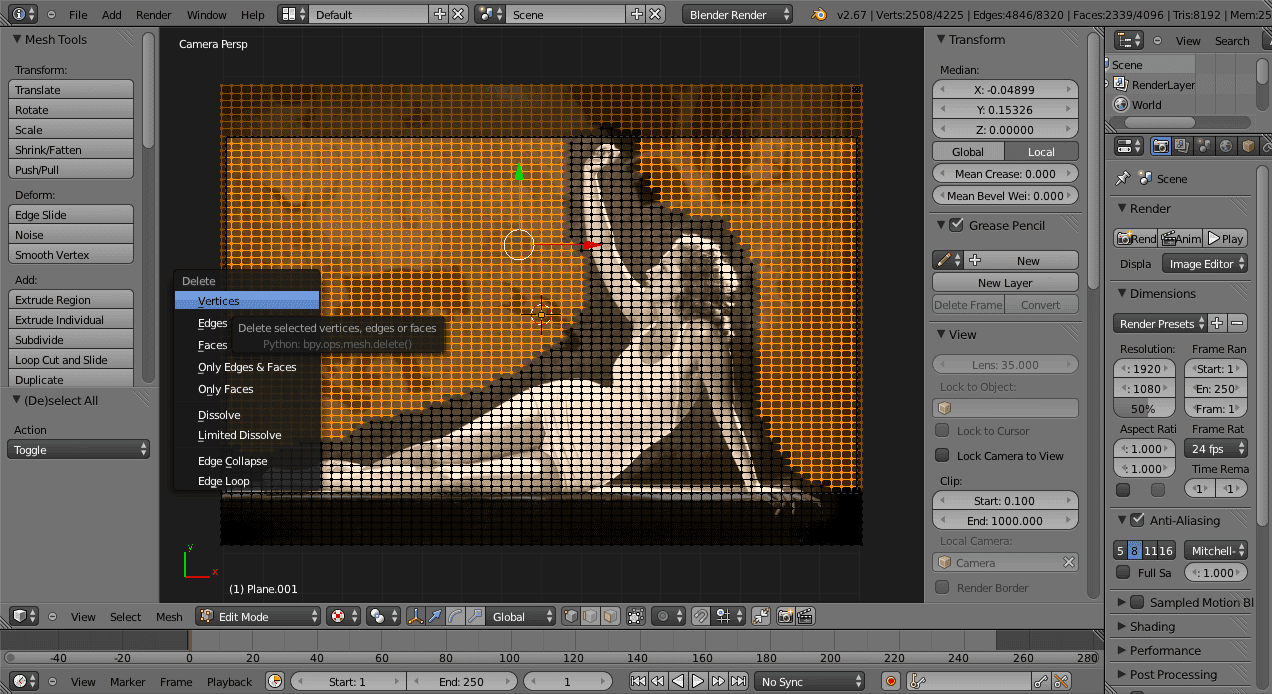
Select all the vertices in a rough outline around your image, and press the X key to invoke the Delete menu. You can just choose Vertices from this menu. You should be left with a simpler mesh containing only your woman image. Hit the Tab key again to exit Edit mode.
Here is what things look like at the moment:
To clear a little space while I work, I am going to hide the Transform and Object Tools palettes from my view. They can be toggled on/off by pressing the N key and T key respectively.
I am also going to increase the size of the Properties panel on the right. This can be done by clicking and dragging on it’s edge (the cursor will change to a resize cursor):
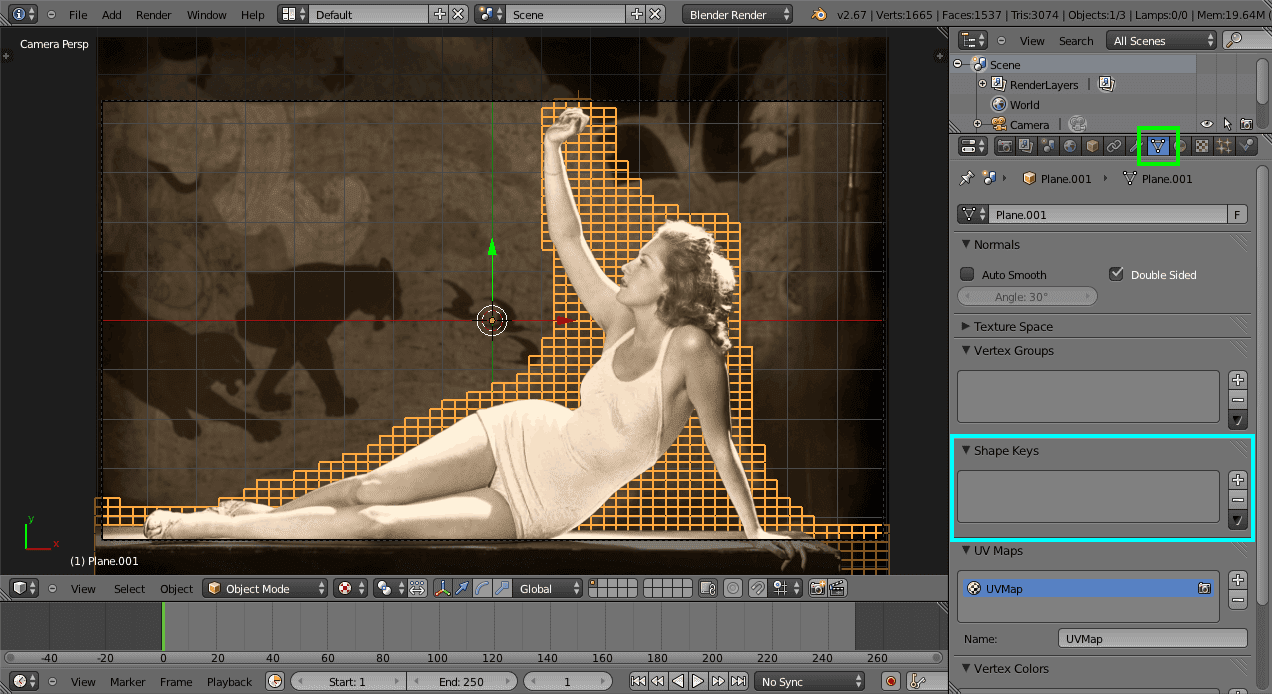
We will want to change the Properties panel to show the Object Data for the woman image plane. Click on that icon to show the Object Data panel. You will see the entry for Shape Keys in this panel.
We want to add a new Shape Key to this mesh, so press the + button two times to add two new keys to this mesh (one key will be the basis, or default position, while the other will be for the deformation we want). After doing this, you should see this in the Shape Keys panel:
Now, the next time we are in Edit mode for this mesh, it will be assigned to this particular Shape Key. We can just start editing vertices by hand now if we want, but there’s a couple of things we can do to really make things much easier.
Proportional Editing Mode
We should turn on Proportional Editing Mode. This will make the deformation of our mesh a bit smoother by allowing our changes to effect nearby vertices as well. So in your 3D View press the Tab key again to enter edit mode.
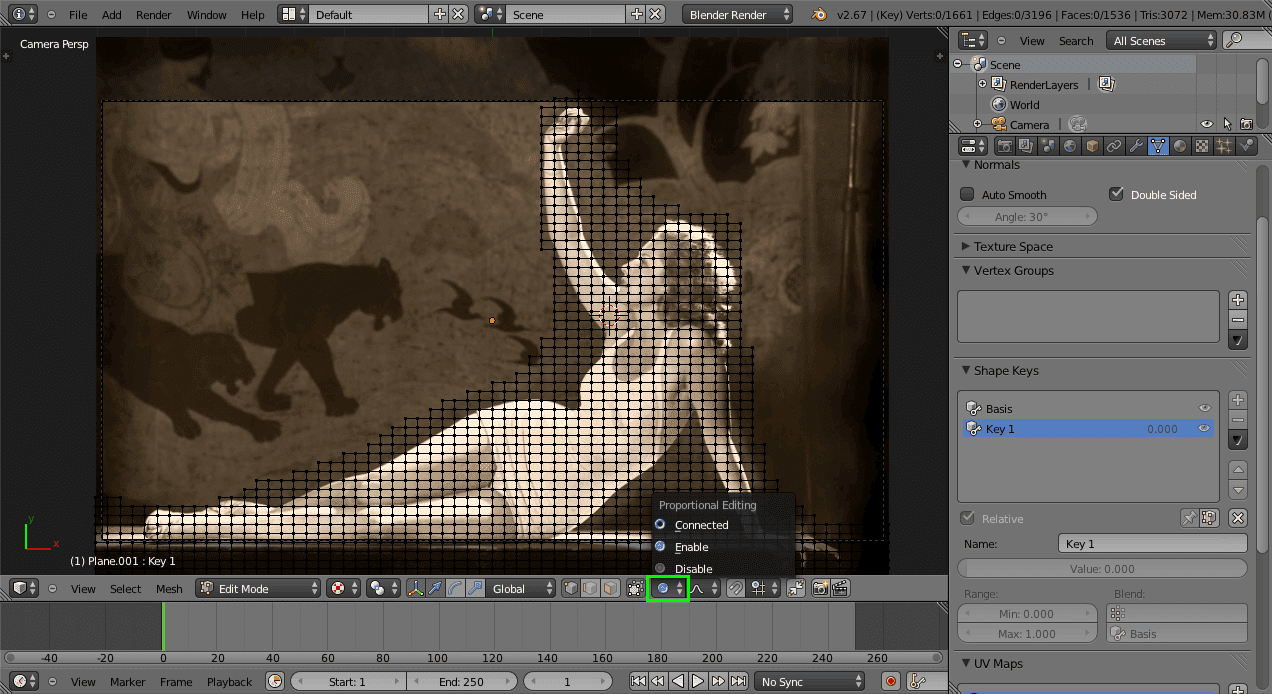
Once in Edit mode, there is a button for accessing Proportional Editing Mode. Once here, just click on Enable to turn it on.
To test things out, you can Right-click to select a vertex in your mesh, and use the G key to move it around. You should see nearby vertices being pulled along with it. Rolling your MouseWheel up or down will increase/decrease the radius of the proportional pull. Remember, to get out of the current action you can just hit the ESC key on your keyboard to exit without making any changes.
If you really screw up and accidentally make a mess of your mesh, it’s easy to get back to the base mesh again. Just hit Tab to get out of Edit mode, then in the Shape Keys panel you can hit the “−” button to remove that shape key. Just don’t forget to hit “+” again to add another key back when you want to try again.
Pivot Point
Blender lets you control where the current pivot point of any modifications you make to the mesh should be. By default it will be the median point of all selected objects, which is fine. You may occasionally want to specify where the point of rotation should be manually.
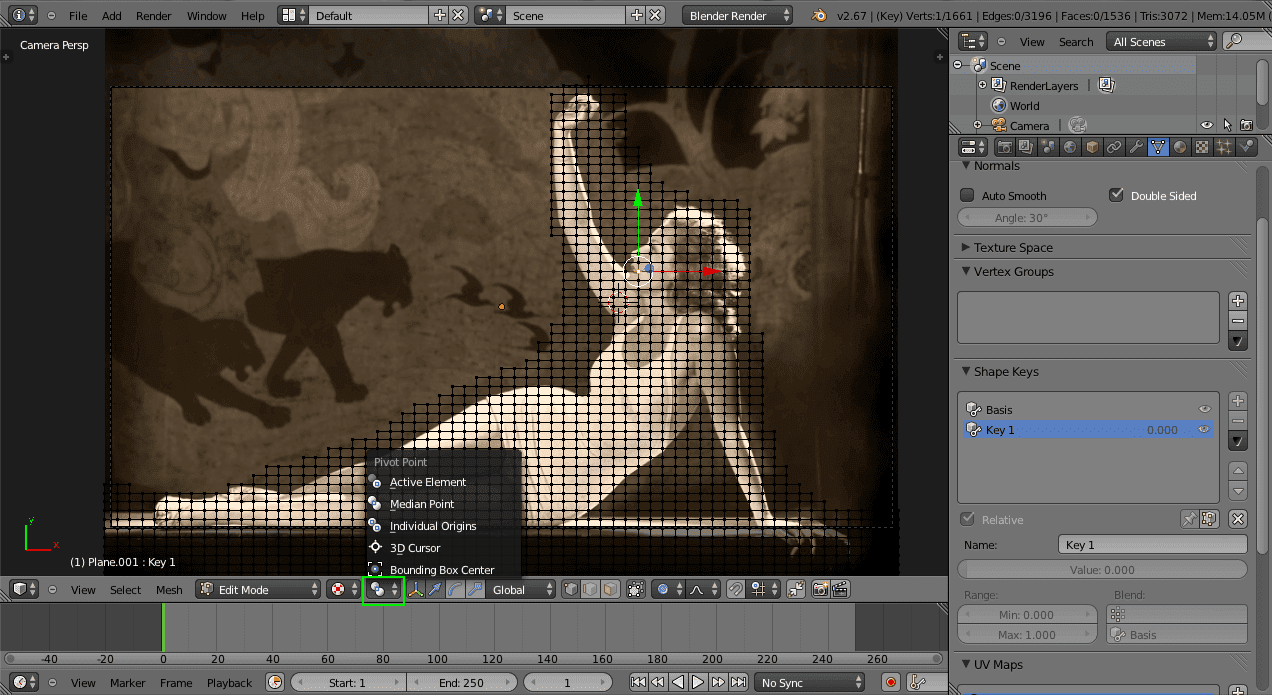
The button for adjusting the pivot point is in the toolbar of the 3D View. I’ll usually only use Median Point or 3D Cursor when I’m doing these. Remember: Left-clicking the mouse in 3D View will set the cursor location. You can leave it at Median Point for now.
To Animate!
Ok, now we can actually get to the animating of the mesh. We need to decide what we’d like the mesh to look like it’s doing first, though. For this tutorial let’s do a couple of simple animations to get a feel for how the system works. I’m going to focus on changing two things.
First we will rotate the womans head slightly down from it’s base position and second we will rotate her arm down slightly as well.
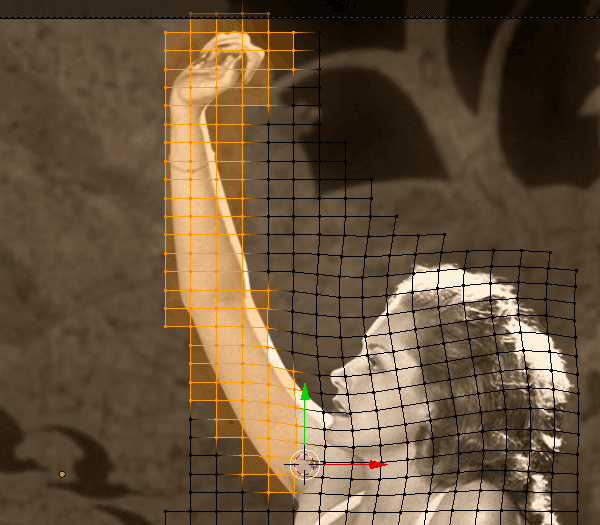
Let’s start with rotating her head. I will use the circle-select in the 3D View again to select a bunch of vertices in the center of her head (no need to exactly select all the vertices all the way around):
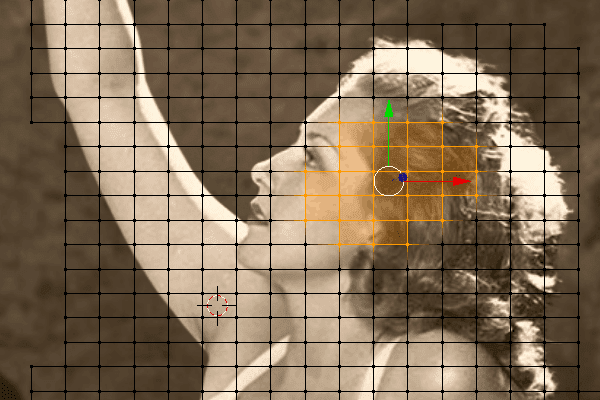
In the 3D View, press the R key to rotate those vertices. With Proportional Editing turned on you should see not only your selected vertices, but nearby vertices also rotating. While in this operation, the mousewheel will adjust the radius of the proportional editing influence (the circle around my rotation in my screenshot shows where my radius was set):
Remember: hit the ESC key if you need to cancel out of any operation without applying anything. Go ahead and rotate the head down a bit until you like how it looks. When you get it where you’d like it, just Left-click the mouse to set the rotation. Subtle is the name of the game here. Try small movements at first!
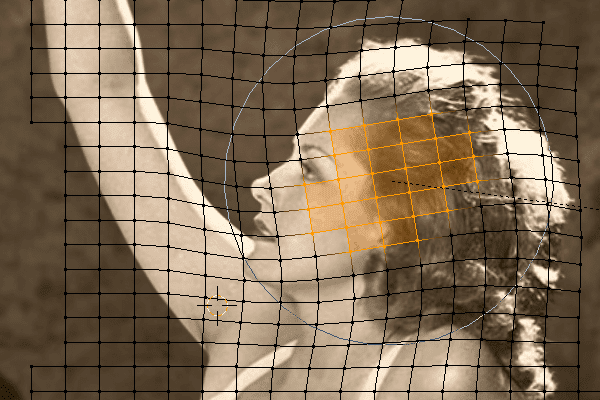
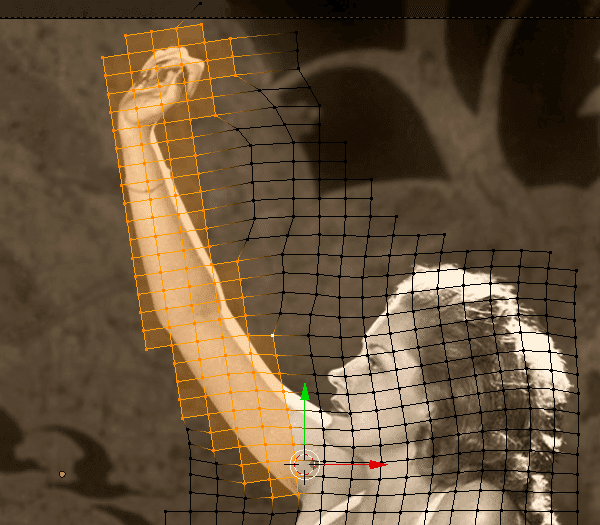
Now let’s move on to rotating the arm a bit. Hit the A key to de-select all the vertices, and choose a bunch of vertices along the arm (again, I use the circle-select C key to select a bunch at once easily):
If you end up selecting a couple of vertices you don’t want, remember that you can Shift + Right-click to toggle adding/removing vertices to the selection set. For example, in my image above I didn’t want to select any vertices that were too close to her face to avoid warping it too much. I also went ahead and made sure to select as many vertices around the arm as I could.
I also Left-click in the location you see in my screenshot to place the cursor roughly at her shoulder. For the arm I also changed the Pivot Point to be the 3D Cursor because I want the arm to pivot at a natural location.
Again, hit the R key to begin rotating the arm. If you find the rotation pulls vertices from too far away and modifies them, scroll your mousewheel to decrease the radius of the proportional editing. In my example I had the radius of influence down very low to avoid warping the womans face too much.
As before, rotate to where you like it, and Left-click the mouse when you’re happy.
Finally, you can test how the overall mesh modifications will look with your Shape Key. Hit the Tab key to get out of Edit Mode and back into Object Mode. All of your mesh modifications should snap back to what they were before you changed anything.
Don’t Panic.
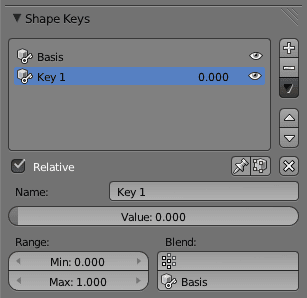
What has happened is that the mesh is currently set so that the Shape Key we were modifying has a zero influence value right now:
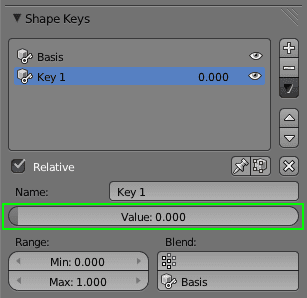
The Value slider for the shape key is 0 right now. If you click and drag in this slider you can change the influence of this key from 0 - 1. As you change the value you should be seeing your woman mesh deform from it’s base position at 0, up to it’s fully deformed state at 1. Neat!
Once we’re happy with our mesh modifications, we can now move on to animating the sequence to see how things look!
Animating
So what we now want to do is to animate two different things over the course of time in the video. First we want to animate the mesh deformation we just created with Shape Keys, and second we want to animate the movement of the camera through our scene.
If you have a look just below the 3D View window, you should be seeing the Timeline window:
The Timeline window at the bottom
What we are going to do is to set keyframes for our camera and mesh at the beginning and end of our animation timeline (1-250 by default).
We should already be on the first frame by default, so let’s set the camera keyframe now. In the 3D View, Right-click on the camera border to select it (will highlight when selected). Once selected, hit the I key to bring up the keyframe menu.
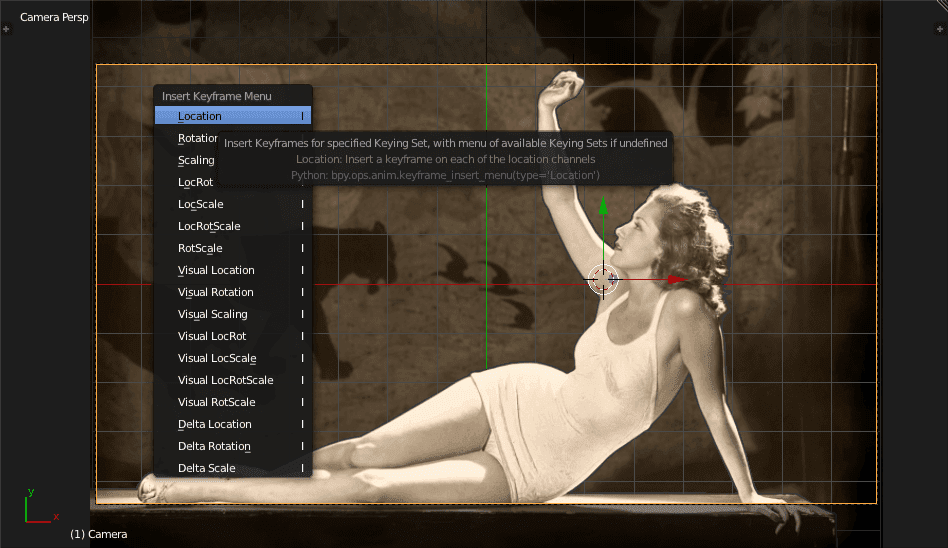
You’ll see all of the options that you can keyframe here. The one we are interested in is the first, Location. Click it in the menu. This tells Blender that at frame 1 in our animation, the camera should be located at this position.
Now we can define where we’d like our camera to be at the end of the animation. So we should move the frame to 250 in the timeline window. The easiest way to do this is to hit the button to jump to the last frame in the range:

This should move the current frame to 250. Now we can just move the location of our camera slightly, and set a new keyframe for this frame. I am going to just move the camera straight up slightly:
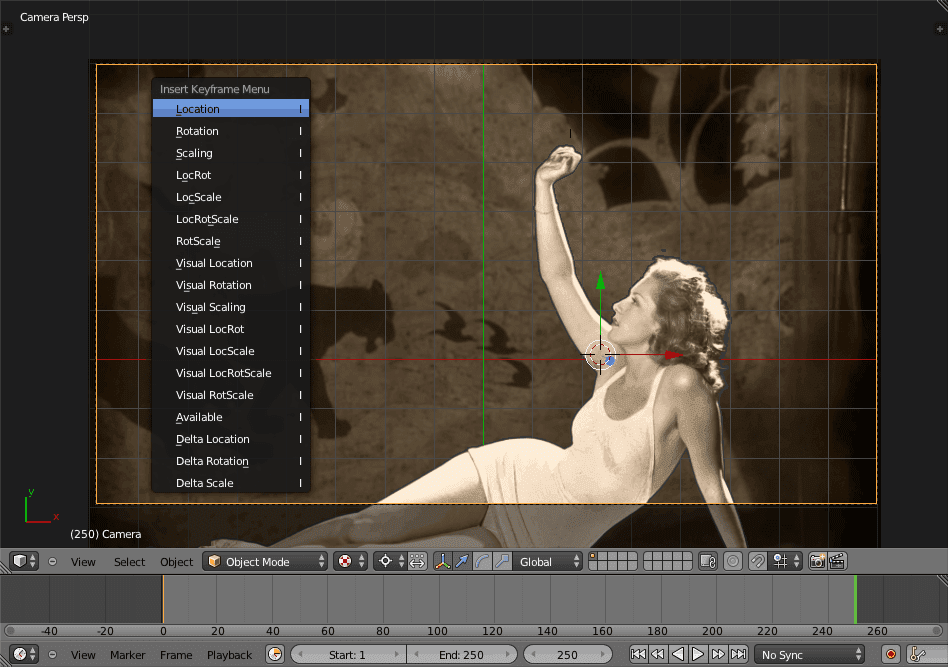
Once position, hit the I key again and set a Location keyframe.
At this point, if you wanted to preview what the animation would look like you can press Alt-A to preview the animation so far (hit ESC when you’re done).
Now we want to do the same thing, but for the Shape Keys to deform over time from the base position to the deformed position we created earlier. In the Timeline window, get back to frame 1 by hitting the jump to first frame in range button:

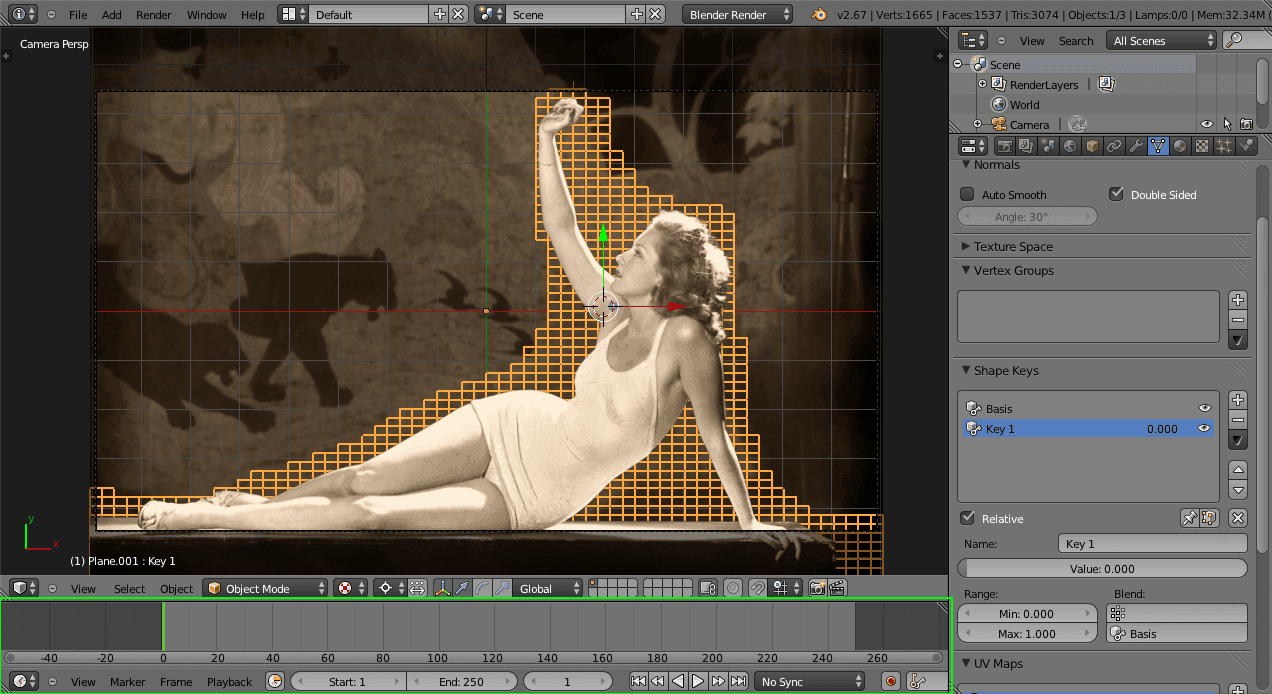
Once back at frame 1, take a look at the Shape Keys panel again:
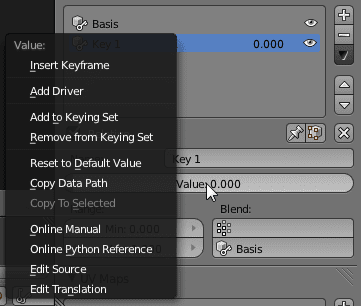
Make sure the value is 0, then Right-click on the slider and choose the first entry, Insert Keyframe:
Just like with the camera, now jump back to the last frame in the range. Then set the value slider for the Shape Keys to 1.000. Then Right-click on the Value slider again, and insert another keyframe.
This tells Blender to start the animation with no deformation on the mesh, and at the end to transition to full deformation according to the Shape Key. Conveniently Blender will calculate all of the vertices locations between the two for us for a smooth transition.
As before, now try hitting Alt-A to preview the full animation.
Congratulations, you made it!
Getting a Video Out
If you’re happy with the results, then all that’s left now is to render out the video! There are a few settings we need to specify first, though. So switch over to the Render tab in Blender:
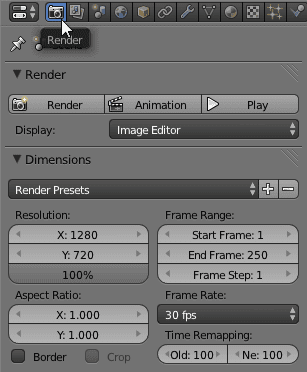
The main settings you’ll want to adjust here are the resolution X & Y and the frame rate. I rendered out at 1280×720 at 100% and Frame Rate of 30 fps. Change your settings as appropriate.
Finally, we just need to choose what format to render out to…
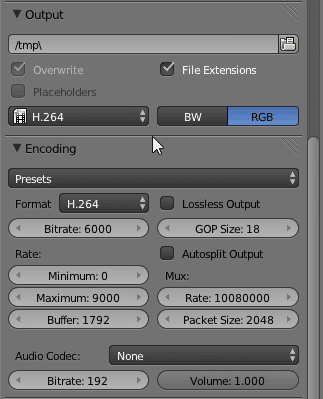
If you scroll down the Render panel you’ll find the options for changing the Output. The first option allows you to choose where you’d like the output file to get rendered to (I normally just leave it as /tmp - it will be C:\tmp in windows). I also change the output format to a movie rendering type. In my screenshot it shows “H.264”, by default it will probably show “PNG”. Change it to H.264.
Once changed, you’ll see the Encoding panel become available just below it. For this test you can just click on the Presets spinner and choose H264 there as well.
Scroll back up to the top of the Render panel, and hit the big Animation button in the top center (see the previous screenshot).
Go get a cup of coffee. Take a walk. Get some fresh air. Depending on the speed of your machine it will take a while…
Once it’s finished, in your tmp directory you’ll find a file called 0001-250.avi. Fire it up and marvel at your results (or wince). Here’s the result of mine directly from the above results:
Holy crap, we made it to the end. That was really, really long.
I promise, though, that it just reads long. If you’re comfortable moving around in Blender and understand the process this takes about 10-15 minutes to do once you get your planes isolated.
Well, that’s about it. I hope this has been helpful, and that I didn’t muck anything up too badly. As always, I’d love to see others results!
[Update] Reader David notes in the comments that if the render results look a little ‘soft’ or ‘fuzzy’, increasing the Anti-Aliasing size can help sharpen things up a bit (it’s located on the render panel just below render dimensions). Thanks for the tip David!