Getting Around in GIMP - Photography Plugins & Tools
After a recent post I came across on the FOSSPhotography sub on reddit that proposed to list the “Must Have GIMP Plugins for Photographers” I got a bit irked. I made a snarky comment about how crappy the linked post was, and the mod made a pretty level-headed response: “Make a list and submit it”. So here I am.
Just a little disclaimer before I get started. This is not a comprehensive list at all. Most of my work utilizes the built–in functionality of GIMP. So they are not all done with plug–ins/scripts, rather I’ll work those built–in functions manually to modify my images. I’m 100% positive I’ve left a few other great things out, but not intentionally for the most part. If I am missing something that you think I really should have included, let me know in the comments!
Also, this is what works for me . I make no claims that this is the way you should approach things (except for the learning concepts part - everyone should learn to approach things that way).
Tools

When I refer to ‘tools’ I’m really referring to concepts. The great thing about learning concepts is that you can then transfer that knowledge to just about any other system. If you haven’t noticed, I try my best to speak more about concepts in my tutorials (and then how those concepts are applied in GIMP, of course).
For example, consider creating a B&W image. Many people will simply desaturate the image and call it a day, but some people may realize the concept that the red channel of an image is often very flattering to skin tones. So they may want to overlay a copy of the red channel over their image to enhance those tones.
The concept of the red channel being flattering to skin, and overlaying it to enhance those tones is (relatively) universal. Chances are you can find a way to get a layer of the red channel in just about any image editor.
Learning the concepts will serve you very well as you explore more post–processing techniques, and removes your dependance on any single piece of software.
Scripts & Plugins
What follows is just a short list of plugins/scripts that I’ve found to be very helpful for photographic retouching purposes. It’s not a complete list, just the things I’ve found myself using over and over again whenever I fire up GIMP to edit photographs.
G’MIC
I’m going to get the big one out of the way right up front. G’MIC for GIMP is a plugin to a very powerful image processing framework. I mean really powerful.

Some really creative people have taken the scripting capabilities to heart, and are responsible for creating some extremely interesting filters for G’MIC. For instance, there are currently over 493 different filters available that produce a wide range of effects. I’ll only have room to mention a few of them here.
Smoothing and Noise Reduction
Filters → G’MIC… → Repair → Smooth
My first encounter with what was then GREYCstoration was during my search for an open source noise reduction. At the time Noise Ninja was quite popular, and appeared to produce good results. My searching led me to GreyC.
Here was an open source implementation of a few different noise reduction methods that could easily match the output from the commercial offerings.
There are many options to control how the smoothing takes place, which can be overwhelming for a first time user, but the defaults are sane and give a good starting point to begin experimenting and fine–tuning. What’s more, since the time I first started using it there are now a total of 10 different methods of noise reduction available (not counting other contributors custom tweaked derivations of those):
- anisotropic
- bilateral
- diffusion
- mean-curvature
- median
- patch-based
- selective gaussian
- thin brush
- total-variation
- wavelets
It is still, in my opinion, the single best option for noise reduction in F/OSS photography, hands down.
Black and White
Filters → G’MIC… → Black & white → Black & White
The G’MIC options for B&W conversion are also heavily considered in my workflow. There’s a high level of control available across the RGB channels (similar to using the channel mixer, but with much better control, and a zoomable preview window), as well as gamma/contrast/brightness. There’s also a nifty option for introducing grain into the image in different luminosity ranges.
Another nice option for approaching B&W through G’MIC is the ability to modify local contrast as well (there’s also a local contrast enhancement filter available separately).
Finally, David was kind enough to include a Pseudogrey dithering option in the B&W conversion for me that lets you use up to 5 scales of difference (if you don’t know what pseudogrey is, have a look here at my previous post).
Even if you haven’t read my previous giant B&W conversion tutorial, this is a great way to do conversions and get instant feedback on what changes in the mixer settings will do to your final result. Skip the “Desaturate” option and start using G’MIC B&W conversion instead (you might be surprised at how quickly you start learning what each of the channel options does to your image!).
Freaky Details
Filters → G’MIC… → Details → Freaky details
This doesn’t always make it into my workflow, because it’s highly dependent on the image it’s being applied to, but I love that it’s only a single click away now. I had previously written a tutorial on achieving this effect from Ps guru Calvin Hollywood, but was missing a very important layer blending mode that GIMP doesn’t have: Vivid Light.
A few conversations later, and it was there. However, he wasn’t content with supplying just one step for the process, and implemented the entire process into a single filter directly. You can still follow my original steps for doing this in GIMP, but David’s version in G’MIC is just faster and easier once you know what it does.
Local Contrast Enhancement
Filters → G’MIC… → Details → Local contrast enhancement
Local contrast enhancement is relatively easy to achieve, it’s really just an Unsharp Mask with a large radius, and a low amount. However, in the G’MIC version you can also adjust the dark/light levels independently, as well as apply the effect to a particular channel instead of the entire image (luminance would be a good place to start). This can be quite handy when fiddling with LCE towards the end of processing.
Sharpening
Filters → G’MIC… → Details → Sharpen
So you need to add a little sharpening at the end of your processing (you are only sharpening as the last step before exporting, right?!), then look no further than G’MIC. In the same way there are many different algorithms for smoothing noise in an image, there are many algorithms for doing the reverse.
G’MIC makes available 8 different sharpening methods for you, and I’m sure one of them will work for what you want! At the moment they are:
- deblur
- Gold-Meinel
- inverse diffusion
- octave sharpening
- Richardson–Lucy
- shock filters
- unsharp mask
- Whiten
Layer Blending Modes
Filters → G’MIC… → Layers → Blend [standard]
GIMP has 21 different layer blending modes that you’re all probably familiar with. G’MIC has 42 currently. These come in really handy when you’re trying to follow a tutorial in Photoshop for instance. As I said earlier, the Vivid Light blending mode doesn’t exist in GIMP at all, and was recently added to G’MIC. There are a few other Ps layer blending modes that you’ll now be able to find thanks to G’MIC.
Just Go Get It
I can’t stress this enough, but I have barely begun to scratch the surface of all the filters and effects available through G’MIC. If there is one thing you download to add on to GIMP, this needs to be that one thing.
Wavelet Decompose/Denoise/Sharpen
For anyone that’s been reading my stuff for a little while, you’ve probably noticed that I’m a huge fan of Wavelet Decompose. GIMP Registry user marcor released the 3 Wavelet operation plugins quite a few years back, and they’re still an amazing suite of operations for image processing.

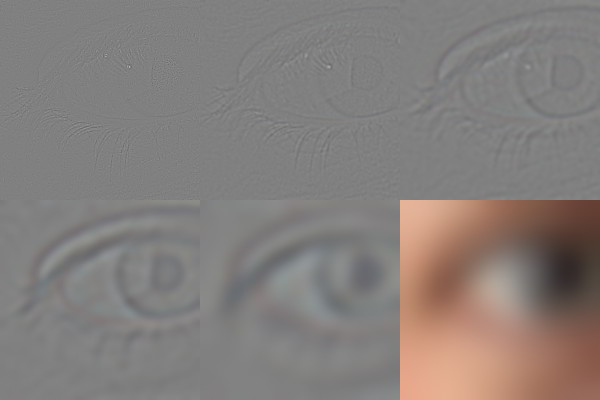
Sample 5 wavelet scales + residual
The fundamental idea is that the image is broken down according to its varying frequency levels. You can then modify any of the frequency levels independent of the others. For decompose, this means that I can retouch features in an image based on their relative size to other features separately (think high/low frequency separation on steroids). I’ve written tutorials about using it before, so I won’t rehash them here, but needless to say for portrait/skin retouching work, this is my go–to method.
I don’t personally use Wavelet Sharpen, only because I often decompose anyway as one of my steps, and I can re–use one or more of those scales to do my sharpening manually (the same with denoise).
Luminosity Masks
Photographer Tony Kuyper described a method in Ps of using masks and layers derived from the luminosity separation of an image a few years back, and it’s a great article to serve as an introduction to the process. Basically, it’s a method for breaking the image down to multiple layers that are all masked with luminosity values that contain a certain range of tones in an image (bright values, mid values, and dark values).
This let’s you now modify the image and to constrain those modifications to a certain tonal region with minimal impact on the other tones (brighten the shadows without affecting the rest of the tones, or vice–versa). Mike Rosulek wrote a script to automate the process of creating these masks.
I use these all the time. It’s just too handy to be able to restrict modifications to certain tonal regions in an image.
Resynthesizer
Long before Adobe introduced “Content–Aware Fill” to Photoshop, we GIMP users had Resynthesizer. Couple the plug–in with the helper script “Heal Selection”, and you had a pretty powerful method for filling in areas based on surrounding textures.
I had also previously done an in–depth look at using this plug–in with the “Heal Selection” helper script, and wrote up a bit more over on GimpChat about considering your surrounding textures when using it to maximize the results.

I don’t use this as often as the rest of the things I’ve mentioned so far, but when you need it, boy does it feel like magic.
Liquid Rescale
This is another plug–in that I don’t use that often, but is really handy when I do need it. This will basically use a seam–carving algorithm to slice away portions of your image (or fill it in) in order to resize it in some fashion. Check it out with more examples.
This approach is something that the G’MIC team has also been playing with lately – so keep an eye out there for another implementation.
This is not complete
As I said in the beginning, this is just a small simple list of my most commonly used plug–ins and scripts. I haven’t even mentioned the myriad of functions that I use on every single photo (like Curves, Levels, colorspace decomposition, layer blending modes, layer masks, etc…).
It’s a nice place to start, though, if you’re looking for handy tools to help with your photographic retouching workflow.
